Introduction: Meet the Friendliest Alligator You Will Ever Crochet
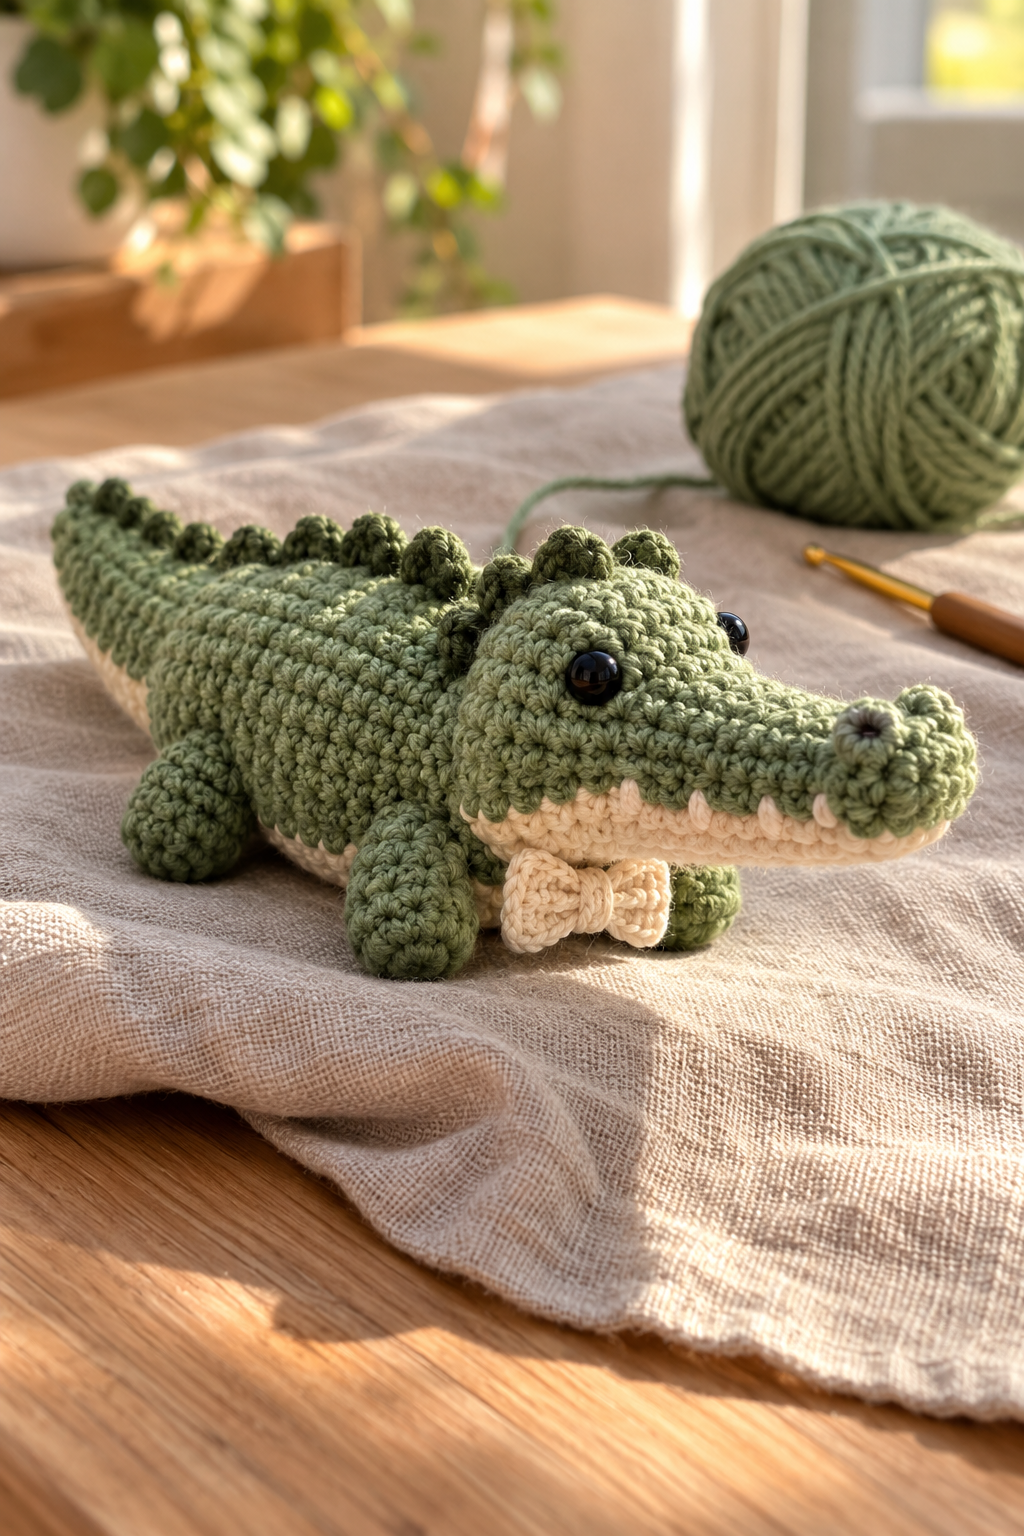
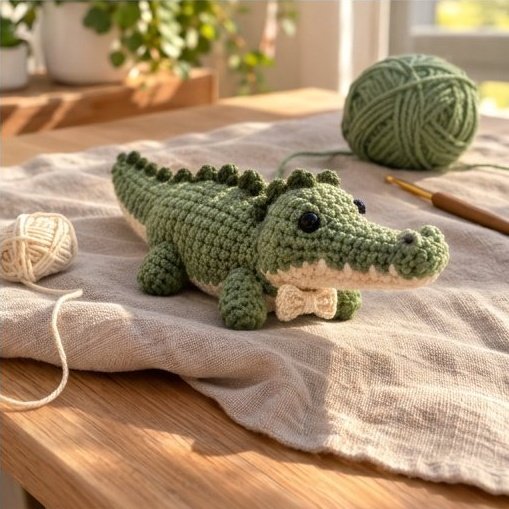
Alligators are not usually the first animal people think of when they imagine something cuddly. They have long snouts, rows of teeth and spiky backs. But in yarn, everything changes. This adorable mini crochet alligator has a soft sage green body, a creamy belly, big shiny black eyes and a tiny cream bow tie that gives him the manners of a very polite gentleman.
He is small enough to sit in your palm, simple enough for a beginner to finish in a weekend, and charming enough that everyone who sees him asks, “Can you make me one?” The little bumps along his back and the curled tail give him personality. The bow tie makes him a perfect gift for birthdays, baby showers, graduation days or any time you want to say, “I’m thinking of you.”
In this tutorial, I will walk you through the whole process, from the first magic ring to the final bow tie. Every stage has a photo, so you can compare your work with the picture and see whether you are on the right track. Let me tell you what you will learn:
- Which yarn, hook and tools to choose
- How to crochet the body, tail, head, legs and spiky back bumps
- How to make the cream belly and the toothy jaw
- How to curl the tail so it looks like the one in the photos
- How to crochet and attach the bow tie
- Troubleshooting tips, customization ideas and care instructions
- A complete FAQ at the end
Pour yourself something warm, put on your favorite show and let’s make an alligator.
Why You Will Love This Adorable Mini Crochet Alligator Pattern
There are thousands of amigurumi patterns online, so what makes this one special?
It uses basic stitches only. If you know the magic ring, single crochet, increase and decrease, you can make the entire body. The only slightly special stitch is the tiny dome used for the back bumps, and it is made from the same basic stitches.
It is truly mini. The finished alligator is only about 9 to 10 inches (23 to 25 cm) long including the tail, and about 3 inches (8 cm) tall. That means little yarn, little stuffing and a quick finish.
It has a lot of character. The bumps on the back, the cream teeth along the jaw, the curled tail and the bow tie all add personality without adding difficulty.
It is a stash-buster. You only need small amounts of green and cream yarn, plus a few scraps for the nose and details.
It sells well. Reptile-themed amigurumi is a popular niche. Most handmade toys are bears, bunnies and cats, so an alligator stands out at craft fairs and on online shops.
Finished Size and Skill Level
- Length: About 9 to 10 inches (23 to 25 cm) with the tail curled out
- Height: About 3 inches (8 cm), not including the back bumps
- Skill level: Beginner to confident beginner
- Time to make: About 6 to 8 hours in total, spread across a few sittings
- Construction: Worked in continuous spiral rounds, with a few flat pieces, then sewn together
To make a bigger alligator, use a thicker yarn and a larger hook. A chunky yarn with a 4.5 mm hook gives you a plush toy roughly twice the size.
Materials You Will Need
Yarn
- Sage or olive green DK weight yarn (about 50 g) for the body, head, legs, tail and bumps
- Cream yarn (about 20 g) for the belly, the jaw with teeth and the bow tie
- Dark green, dark brown or grey embroidery thread for the nostrils (a scrap is enough)
Cotton yarn gives very crisp stitches and shows off the texture beautifully, as you can see in the close-up photos. Acrylic and cotton blends work well too, and they are softer. Choose a matte yarn for a natural look. Very shiny yarn can make the alligator look plastic.
Hook
- 3.0 mm crochet hook
For amigurumi, always go down a hook size from what the yarn label recommends. Tight stitches keep the stuffing inside and the shapes firm. The hook in the photos has a wooden handle with a golden tip, which is comfortable for long sessions, but any hook you like will do.
Other Supplies
- Black safety eyes, 8 mm, with washers
- Polyester fiberfill for stuffing
- Tapestry needle (blunt, large eye)
- Stitch markers or a scrap of yarn in a contrast color
- Small sharp scissors
- Sewing pins (optional but very useful for placement)
Safety note: if you are making this toy for a baby or a child under three, skip the plastic eyes and embroider them with black thread. Embroidered eyes cannot come off, which makes them the safest choice.
Abbreviations (US Terms)
- MR: magic ring
- sc: single crochet
- inc: increase (2 sc in the same stitch)
- dec: decrease (sc two stitches together; invisible decrease recommended)
- sl st: slip stitch
- ch: chain
- picot: ch 2, sl st in the first chain
- ( ) x: repeat the instructions in brackets
- [ ]: total number of stitches at the end of the round
Before You Start: Four Tips for a Neat Alligator
1. Work in a spiral. Do not join at the end of each round. Use a stitch marker in the first stitch of each round and move it up as you go.
2. Keep your tension even. Texture is everything on this toy. The photos show how nicely the stitches line up when the tension is consistent. Do not pull too hard, or the fabric will be stiff. If it is too loose, the stuffing will show through.
3. Use the invisible decrease. Work your decreases through the front loops only of the next two stitches. This hides the decrease and keeps the surface smooth.
4. Leave long tails. Leave at least 12 inches (30 cm) of yarn on any piece you will sew on later.
What This Photo Shows
This first tutorial photo shows both hands at work. The left hand holds the chain and the first rows of the fabric between the thumb and fingers, close to where the hook is working. This is the best way to control your tension. The right hand holds the hook like a pencil, and the yarn runs over the left fingers to stay under control.
Look at how the stitches sit side by side, with no gaps and no overly tight spots. That is the finish you want for the belly strip and the jaw. If your first rows look wavy, relax your grip a little and try again before you move on.
The Pattern, Step by Step
You will make the following parts:
- The body and tail (green)
- The head with snout (green)
- The four legs (green)
- The back bumps (green, 12 total)
- The cream belly strip
- The cream jaw with teeth
- The bow tie (cream)
Make them in this order. Then follow the assembly section.
Step 1: The Body and Tail (Green)
The body starts at the tip of the tail and grows toward the neck. It is one long, gently widening tube.
- Round 1: 6 sc in MR [6]
- Round 2: (sc, inc) x 3 [9]
- Rounds 3 to 6: sc in each st around [9] (4 rounds)
- Round 7: (2 sc, inc) x 3 [12]
- Rounds 8 to 12: sc in each st around [12] (5 rounds)
- Round 13: (3 sc, inc) x 3 [15]
- Rounds 14 to 18: sc in each st around [15] (5 rounds)
- Round 19: (4 sc, inc) x 3 [18]
- Rounds 20 to 23: sc in each st around [18] (4 rounds)
- Round 24: (5 sc, inc) x 3 [21]
- Round 25: (6 sc, inc) x 3 [24]
- Round 26: (7 sc, inc) x 3 [27]
- Rounds 27 to 36: sc in each st around [27] (10 rounds)
This is the widest part of the body. Now begin to narrow toward the neck.
- Round 37: (7 sc, dec) x 3 [24]
- Rounds 38 to 40: sc in each st around [24] (3 rounds)
- Round 41: (6 sc, dec) x 3 [21]
- Round 42: sc in each st around [21]
- Round 43: (5 sc, dec) x 3 [18]
Stuff the body firmly in the middle and a little more lightly in the tail. The tail needs to bend, so do not pack it too hard. Do not close the neck opening. Fasten off, leaving a long tail, and set the body aside.
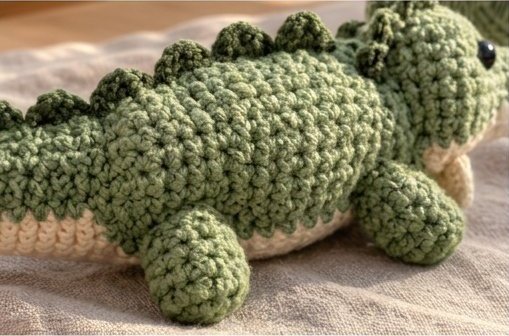
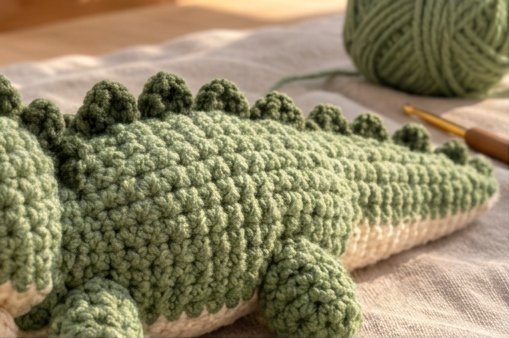
What This Photo Shows
This close-up from the side shows what your body should look like when it is complete and stuffed. Look at the rounded middle, which tapers gently toward the head on the right and toward the tail on the left. The stitches form neat horizontal rows with a bumpy, cozy texture.
Two details are worth noticing. First, the cream belly runs along the very bottom edge, a thin line of pale yarn that contrasts with the green. Second, the chunky round legs sit low on the body, so the alligator stays close to the ground. You will add these parts in later steps. For now, compare the shape of your body with this photo. If yours looks too thin, add a little more stuffing in the middle.
Step 2: The Head and Snout (Green)
The head is worked from the tip of the nose backward. The snout is long and slim, then it widens to make room for the eyes.
- Round 1: 6 sc in MR [6]
- Round 2: inc in each st around [12]
- Round 3: sc in each st around [12]
This small, rounded tip is the nose. In the photos, you can see that it is slightly puffier than the snout behind it, with a little nostril detail. Keep going.
- Round 4: (4 sc, dec) x 2 [10]
- Rounds 5 to 8: sc in each st around [10] (4 rounds)
- Round 9: (4 sc, inc) x 2 [12]
- Round 10: (5 sc, inc) x 2 [14]
- Round 11: (6 sc, inc) x 2 [16]
- Round 12: (7 sc, inc) x 2 [18]
- Round 13: (8 sc, inc) x 2 [20]
- Round 14: (9 sc, inc) x 2 [22]
Now insert the safety eyes. Place them on round 15, on the top of the head, about 7 stitches apart. Check the placement by pinning before you fix the washers. Eyes that are slightly raised and wide apart give your alligator a friendly, curious look.
- Rounds 15 to 19: sc in each st around [22] (5 rounds)
- Round 20: (9 sc, dec) x 2 [20]
- Round 21: (8 sc, dec) x 2 [18]
Stuff the head firmly, especially the snout. Use small pieces of stuffing and push them to the tip with the blunt end of your hook. Do not close the opening. Fasten off and leave a long tail.
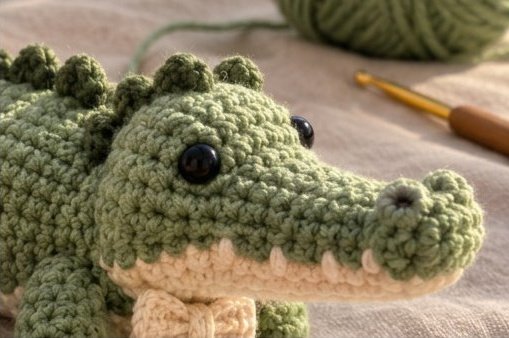
What This Photo Shows
This close-up shows everything about the face. Start at the right with the nose. The tip is slightly larger than the snout, and you can see a tiny dark nostril mark on it. Moving left along the top of the snout, the green stitches run in clean, even rounds all the way to the eye.
The eye is a round black bead, 8 mm, and it sits on top of the head, not on the side. Behind it, a few small round bumps start the line of spikes down the back. Below the green, there is a cream stripe along the jaw, and the edge of it has tiny pale teeth that point up into the green. Under the chin, you can see the top of the cream bow tie.
You will make each of these details in the next steps. For now, check that your snout is straight and not bent upward or downward. A slightly raised snout looks proud, but a very crooked one looks odd.
Step 3: The Legs (Make 4, Green)
The legs are short, chubby nubs. You can see in the photos that they are round and sturdy, not long and thin.
- Round 1: 6 sc in MR [6]
- Round 2: (sc, inc) x 3 [9]
- Round 3: (2 sc, inc) x 3 [12]
- Rounds 4 to 6: sc in each st around [12] (3 rounds)
- Round 7: (2 sc, dec) x 3 [9]
- Round 8: sc in each st around [9]
Stuff lightly. The legs should be squishy, not hard. Fasten off and leave a long tail for sewing.
Step 4: The Back Bumps (Make 12, Green)
Now for the part that gives your alligator his signature spiky look. These tiny domes run along the back from the neck to the tail, and two of them sit behind the eyes.
- Round 1: 6 sc in MR [6]
- Round 2: (sc, inc) x 3 [9]
- Round 3: sc in each st around [9]
- Round 4: (sc, dec) x 3 [6]
Add a tiny pinch of stuffing, fasten off and leave a tail for sewing. Make 12 bumps in total. For the best effect, make the bumps for the back slightly different in size. Use the same yarn but a 2.5 mm hook for four of them. These smaller bumps go near the tail, so the row of bumps gets smaller as it moves toward the tip.
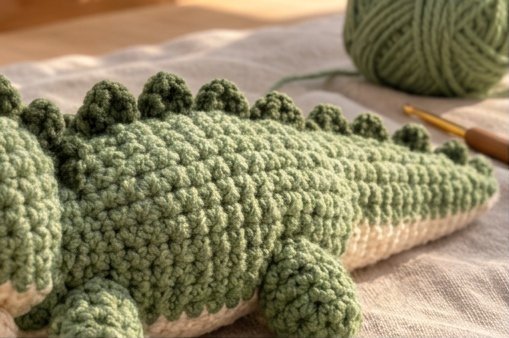
What This Photo Show
This is the best photo for checking how the bumps should look. You can see a row of small, round domes lined up along the top of the body, like little hills. They are evenly spaced, and each one is slightly smaller than the one before. Each dome is firmly stuffed, so it holds its shape.
Look at the way each bump sits straight on the spine, not tilted to the left or right. The cream belly is visible at the bottom edge, and it makes a lovely contrast with the green. The golden crochet hook and yarn ball in the background show the cozy, handmade setting.
Tip for placement: pin all 10 body bumps along the spine before sewing. Leave about 1 stitch of space between them. Step back and check that the line is straight, then sew.
Step 5: The Cream Belly Strip
The belly is a flat strip of cream stitches that runs along the underside of the body. It gives a clean border between the green body and the table.
With cream yarn:
- Chain 41
- Row 1: sc in the 2nd ch from the hook and in each ch across. Ch 1 and turn. [40]
- Rows 2 to 4: sc in each st across. Ch 1 and turn. [40]
Fasten off, leaving a long tail. The strip should be a little shorter than the underside of your body, from the base of the neck to the tail curve. If your body is longer or shorter than mine, add or remove chains to match. Gauge changes from person to person, so measure against your own body piece.
Step 6: The Cream Jaw with Teeth
The jaw is a smaller strip with a toothy edge. This is the detail that makes your alligator look like an alligator and not a green sausage.
With cream yarn:
- Chain 17
- Row 1: sc in the 2nd ch from the hook and in each ch across. Ch 1 and turn. [16]
- Rows 2 and 3: sc in each st across. Ch 1 and turn. [16]
- Row 4 (teeth): sc in the next st, picot repeat across all 16 stitches.
Fasten off and leave a long tail. The picots are your teeth. They should stand up like tiny triangles along one edge.
Step 7: The Bow Tie (Cream)
This tiny accessory is the star of the show. It is simply a small rectangle pinched in the center.
Bow:
- Chain 11
- Row 1: sc in the 2nd ch from the hook and in each ch across. Ch 1 and turn. [10]
- Rows 2 to 7: sc in each st across. Ch 1 and turn. [10]
Fasten off, leaving a 10-inch tail.
Center band:
- Chain 6
- Row 1: sc in the 2nd ch from the hook and across [5]
- Row 2: sc in each st across [5]
Fasten off.
Assembly: fold the bow rectangle in half, then pinch the center so the two ends fan out like a bow. Wrap the center band around the pinch and sew its ends together at the back. Pass the long tail through the center a few times to hold everything firmly.
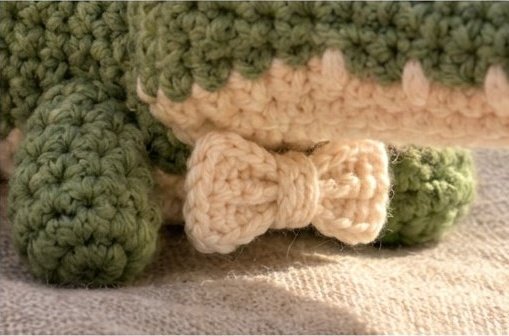
What This Photo Shows
This close-up shows the bow tie from the front. The two wings are puffy rectangles of cream stitches with slightly rounded edges. In the middle, a small band squeezes them together to create the bow shape. The stitches are small and neat, which gives the bow a delicate, tailored look.
Behind the bow, you can see the cream belly edge with its scalloped border and the chunky green front legs on both sides. Notice how the bow sits low, below the chin and between the front legs. When you attach yours, aim for the same position.
Assembly: Putting Your Alligator Together
Now comes the exciting part, when your pile of pieces becomes a character. Be patient and use pins.
1. Join the Head to the Body
Place the head opening against the neck opening. Both have 18 stitches, so they should match. Using the long tail, sew them together stitch to stitch, going around the entire circle. Add a little extra stuffing before you close the last few stitches. Sew around twice for a stronger join.
Check from above that the head is in line with the body. Then check from the side. The head should sit slightly higher than the body, with the snout pointing straight forward.
2. Sew on the Cream Belly
Pin the belly strip to the underside of the body, from the neck to the tail. Using cream yarn and a tapestry needle, sew along both long edges with tiny whipstitches. Pull gently so the strip lies flat. If the body is longer than the strip, tuck the extra edge slightly under the tail curve.
3. Add the Jaw and Teeth
Pin the jaw strip to the underside of the head, with the teeth edge pointing up toward the green snout. The teeth should stand out along the line where the green meets the cream. Sew along the bottom edge and both short sides. The picot edge stays free so the teeth stay visible.
4. Attach the Legs
Pin the front legs just behind the head, on both sides of the body. Pin the back legs about two thirds of the way along the body, toward the tail. Place the legs low, so the alligator sits close to the ground. Set him on a flat surface and check that he stands evenly. Sew each leg with several secure stitches.
5. Sew on the Back Bumps
Pin the 10 bumps along the spine, from the neck down to the tail. Place the largest bumps near the neck and the smallest near the tail. Place the remaining two behind the eyes on the head. Sew each bump firmly.
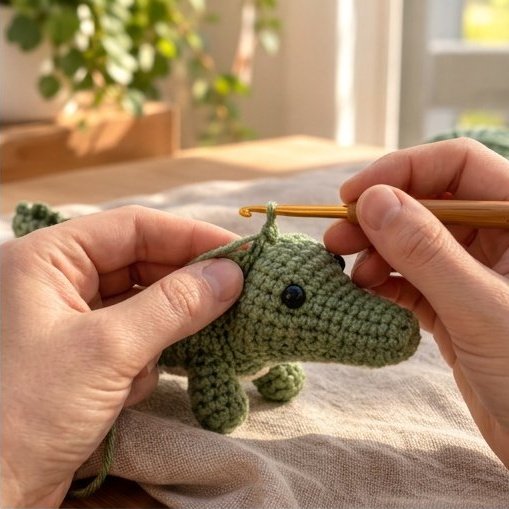
What This Photo Shows
This photo captures the assembly stage. The alligator already has his body, head, black eyes and legs, but he does not have his spiky bumps, jaw or bow tie yet. One hand holds the body steadily, while the other works near the top of the head with the hook. A strand of green yarn hangs from the work, ready to be used.
Notice how the body sits low and the legs are in the right position. The head is clearly attached. This is exactly the point where you want to stop and check that everything is straight before adding details. If something is off, it is much easier to fix now than after you have sewn on all the extras.
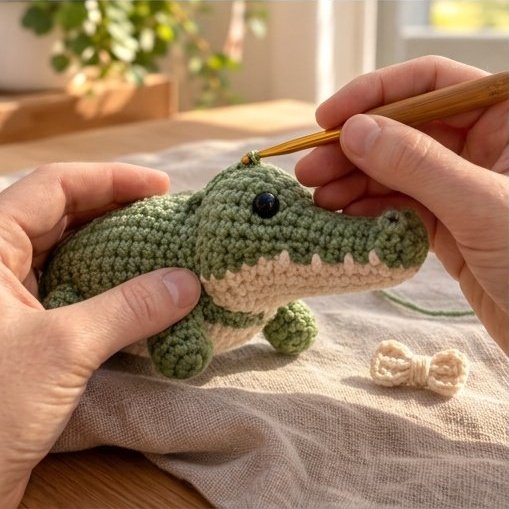
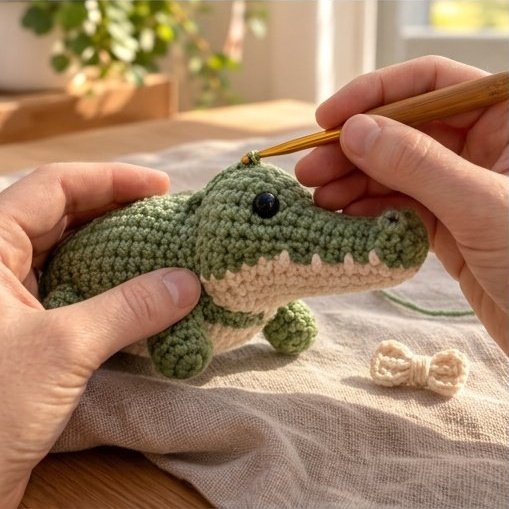
What This Photo Shows
This photo shows a later stage than the previous one. Now the cream jaw with its tiny teeth is clearly sewn in place along the snout. The black eye is in position, and the legs are attached. One hand holds the body while the other uses the hook to place or secure the last bump on the head. On the table, you can see the finished cream bow tie waiting beside the toy.
This image is a great visual reference for the jaw. Notice how the teeth line runs straight from the nose toward the neck, and how the cream stripe tapers at the end. Compare your jaw with this one, and if your teeth are too small, you can embroider a few extra stitches along the edge.
Finishing Touches
Curling the Tail
The curled tail is a lovely signature detail. To get it, bend the tail gently in a spiral, with the tip tucked toward the side of the body. Then use a few hidden stitches with green yarn to hold the curl in place. Do not stuff the tail too firmly, or it will refuse to bend.
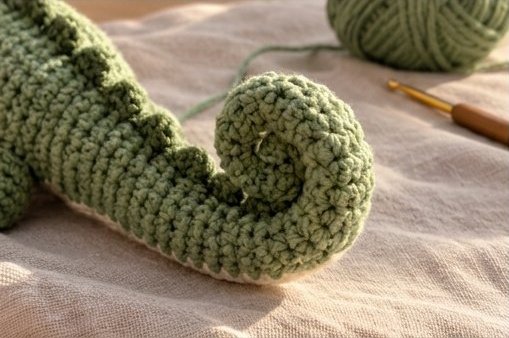
What This Photo Shows
This photo shows the tail as a graceful spiral. The tail tapers in width and rolls inward at the tip, creating a coil like a snail shell. The stitches wrap around in tidy rounds, and the thin cream line along the bottom edge is the belly strip tapering to the end.
When you curl your tail, work slowly. Roll it gently around your finger first to find the shape you like. Then tack it in place with 3 to 4 small stitches from the inside of the curl, so the stitches are invisible. If the tail refuses to hold its shape, remove a little stuffing from it.
Embroider the Nostrils
Using dark thread, embroider two tiny stitches on the top of the nose tip, about 2 stitches apart. Each should be a small, straight stitch or a French knot. Keep them small, since big nostrils look comical.
Attach the Bow Tie
Place the bow tie right under the chin, centered between the front legs. Sew it on with small stitches from behind the center band so no thread shows. If you want a removable bow, sew it to a small loop of cream yarn instead, and slip it over the head.
Troubleshooting Common Problems
My alligator’s head droops.
Add more stuffing near the neck and sew the head on twice. A firm join keeps it upright.
The snout looks bent.
Check that you stuffed the tip fully before the base. Use your hook to push small amounts into the nose, and shape the snout with your fingers as you go.
The teeth are not visible.
Make sure the picot edge points up and is not hidden under the green. You can also embroider small cream stitches for extra teeth.
The bumps lean sideways.
Sew them on with several stitches all the way around the base, not only on one side.
The belly strip is wrinkled.
Your strip is probably too long or too short for the body. Pin first and adjust before sewing. A strip that is slightly too long can be eased in by sewing with small, evenly spaced stitches.
The tail will not curl.
Remove some stuffing and try again. A softer tail curls easily, while a firm one resists.
The legs make the alligator tilt.
Check that all four legs are the same height and placed symmetrically. Unpick one and move it if needed.
Ways to Customize Your Alligator
- Change the colors. A bright lime green gator with a yellow belly looks cheerful. A grey one with a white belly looks elegant.
- Swap the accessory. A tiny top hat, a scarf, a bandana, a crown or a flower can replace the bow tie.
- Add a name tag. Embroider a small name on a felt tag and sew it to the belly.
- Make a family. Make three alligators in different sizes using thin, medium and thick yarn.
- Turn it into a keychain. Use fingering yarn, a smaller hook and a keyring loop. The result is a pocket-sized charm.
- Make a baby version. Skip the plastic eyes, use soft cotton and embroider the face. Add a ribbon-free design for safety.
Caring for Your Crochet Alligator
- Spot clean with a damp cloth and gentle soap.
- If you used washable yarn and embroidered eyes, you can hand wash in cool water.
- Reshape while damp and air dry away from direct sunlight.
- Store in a cotton bag or on a shelf, away from damp areas.
- Brush off dust with a soft brush from time to time.
Photography Tips for Your Finished Alligator
The photos in this tutorial have a warm, cozy look, and you can get the same effect.
- Use natural window light. Soft morning or late afternoon light is ideal.
- Choose a neutral backdrop. A linen cloth or a wooden table makes green and cream stand out.
- Add yarn props. A ball of green yarn and a hook add context and tell the story of making.
- Take close-ups. Stitch texture, eyes and the bow tie are what people love most.
- Show the steps. Process photos like the ones above get saved on Pinterest and bring readers back to your blog.
Selling Your Handmade Alligators
If you plan to sell, remember these points:
- Price your time fairly. Count your materials, hours, packaging and fees.
- Check safety rules. Toys for children must follow local regulations, so use embroidered eyes for under-threes.
- Photograph well. Good lighting sells handmade items.
- Check the pattern terms. If you use a pattern written by someone else, read the terms first. If you use this one, credit the source with a link.
- Package with care. A small card with care instructions and a thank-you note leaves a good impression.
Frequently Asked Questions
Is this mini crochet alligator pattern good for beginners?
Yes. It uses only basic stitches and simple shapes. If you can make a magic ring and work in rounds, you can make this alligator.
What yarn is best for this alligator?
DK weight cotton or cotton blend gives the best texture. Acrylic works too and is softer.
What hook size should I use?
A 3.0 mm hook works well with DK yarn. If your stitches look loose, go down to 2.75 mm.
How long does it take?
Most people need 6 to 8 hours, including assembly.
Can I make it without safety eyes?
Yes. Embroider the eyes with black thread using satin stitches or French knots.
How do I make it bigger?
Use thicker yarn and a bigger hook. The same pattern will scale up.
Can I wash it?
If it has embroidered eyes and washable yarn, hand wash gently and air dry.
How many back bumps do I need?
Twelve: ten for the back and two behind the eyes. You can make more for a spikier look.
Can I make this as a gift?
Absolutely. It is a perfect gift for kids and adults who love cute, quirky toys.
Final Thoughts
There is something special about turning a ball of yarn into a creature with a face and a personality. This little alligator, with his sage green body, creamy belly, tiny teeth and neat bow tie, proves that even a reptile can be adorable. Every stitch adds warmth, and that is what makes handmade toys so precious.
Do not worry if your first alligator has a slightly crooked snout or an uneven bump. Those little imperfections are what make him yours. Keep your hook moving, enjoy the process and share your finished gator with the world.
Happy crocheting! 🐊🧶