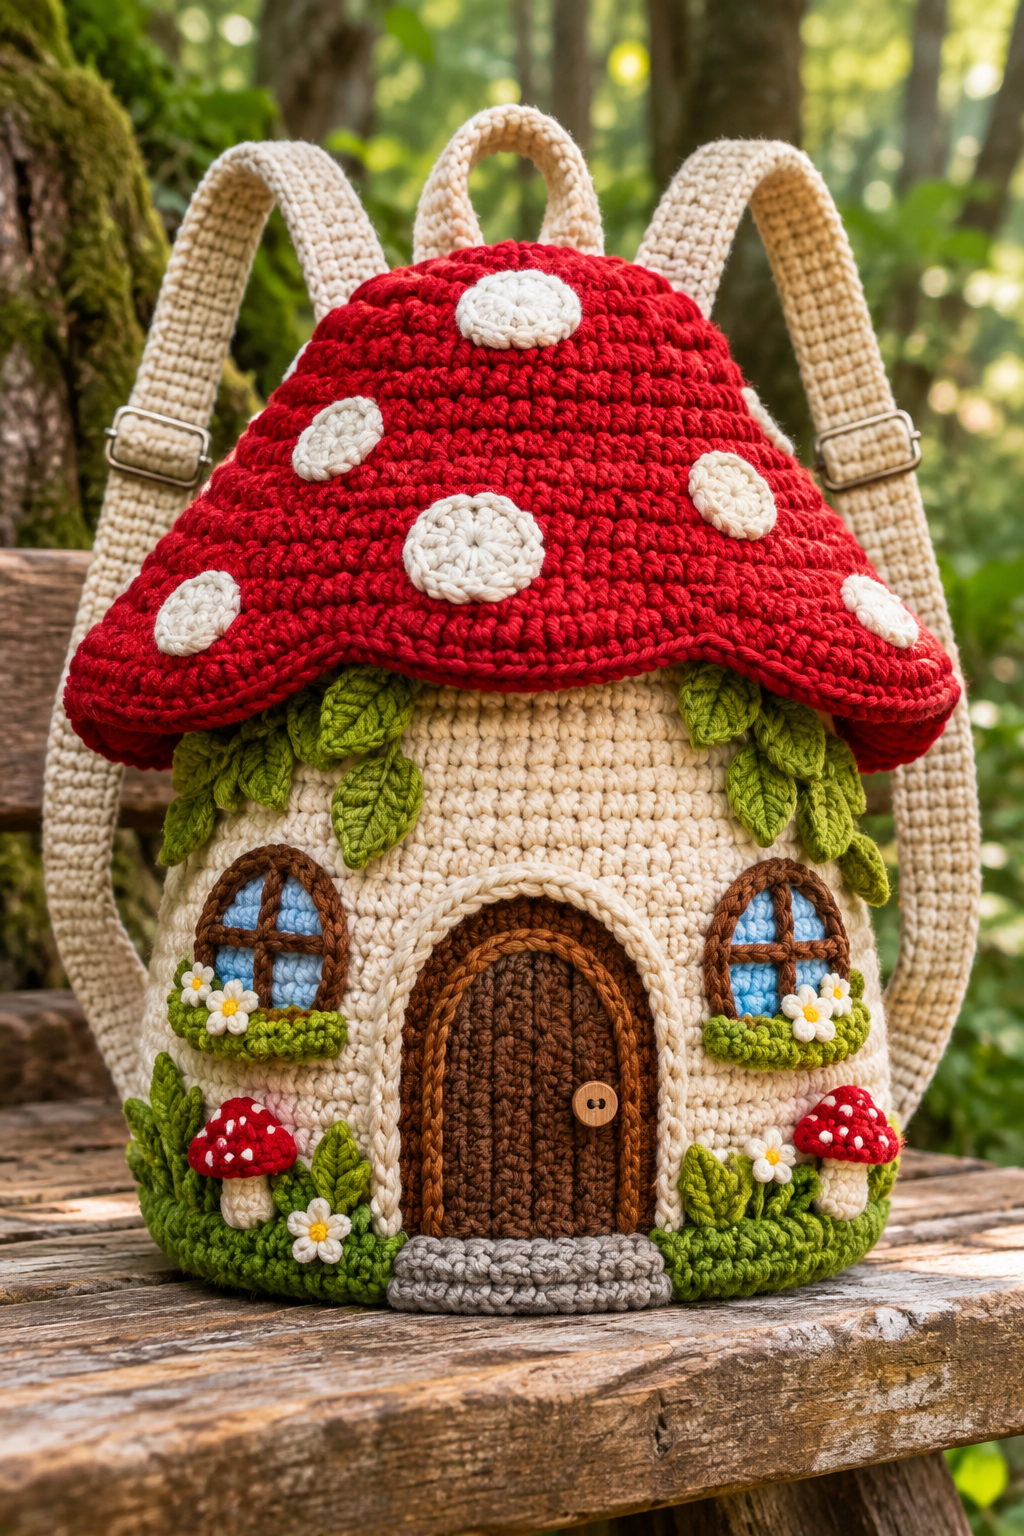
Some projects start with a pattern, and some start with a feeling. This backpack started with a feeling. I was sitting on my porch one evening, watching the light turn golden over the garden, and I kept thinking about those tiny fairy tale cottages that live inside toadstools in old picture books. You know the ones, with a round wooden door, a couple of glowing windows, and a little patch of grass and flowers out front. I wanted to wear one on my back. So I picked up a hook, a pile of red, cream, and green yarn, and started stitching.
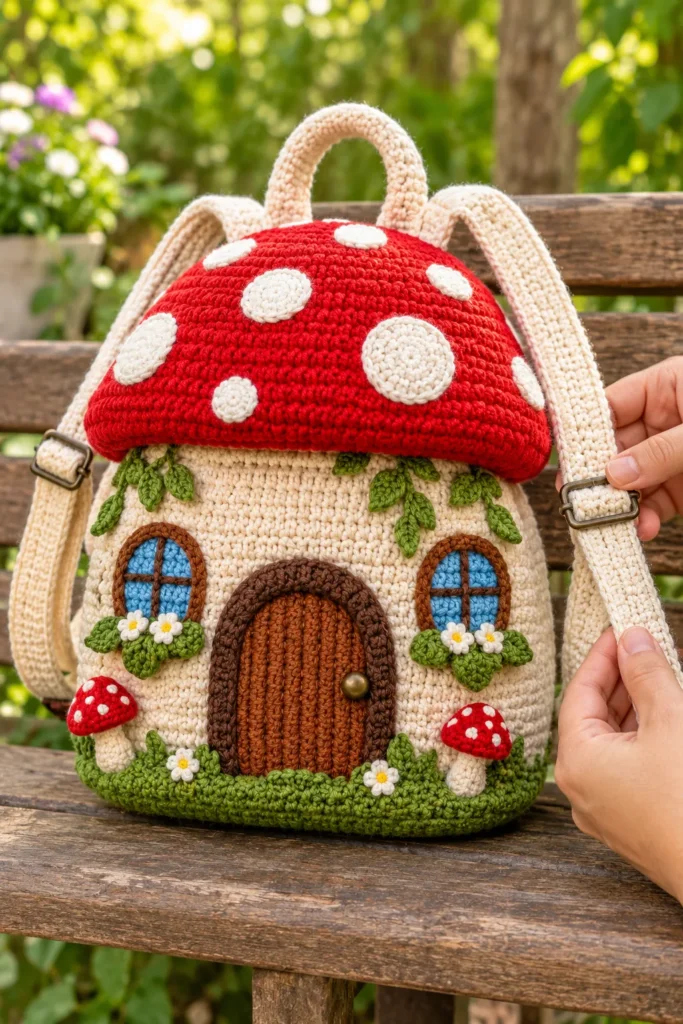
The result is a round, roomy backpack shaped like a mushroom house. It has a bright red spotted cap that works as the lid, a cream colored body, a rounded brown door with a tiny brass button, two arched blue windows with flower boxes, a green grassy base with scalloped edges, and a couple of mini mushrooms standing guard in the grass. Cream straps with metal slide buckles make it comfortable to carry, and a little handle on top lets you hold it like a basket when you are not wearing it.
It is a big project, and I will not pretend otherwise. But it is made from simple stitches, mostly single crochet, and every part of it is built in a way that a confident beginner can follow. If you can crochet in the round and sew pieces together with a yarn needle, you can make this bag. In this post I will walk you through the materials, the base, the body, the cap, the door and windows, the straps, and all the small details that turn a plain crochet bag into a little storybook home.
What Makes This Backpack Special
Before the pattern, let me explain why I think this design works so well. Most crochet backpacks are practical but a little plain. They carry things, and that is the end of the story. This one carries things and also makes people smile. I wore it to a farmers market the first weekend after finishing it, and three strangers stopped me to ask where I bought it. One woman asked if she could take a photo of the door. That never happens with a regular tote.
The shape is also surprisingly useful. The rounded body holds a full sized notebook, a water bottle, a small lunch, and a cardigan without bulging. The cap on top acts like a lid, so everything stays tucked away, and the strap system is adjustable, so it fits both adults and teenagers. If you make a smaller version, it becomes a wonderful kids backpack, and if you leave off the straps completely, it makes a gorgeous yarn basket or project bag for your craft room.
Materials You Will Need
Yarn matters more here than in most patterns, because a bag has to hold its shape and survive daily wear. I used a mercerized cotton in a medium worsted weight. Cotton is firm, it has almost no stretch, and it makes dense fabric that does not sag under the weight of your belongings. Acrylic can work, but it tends to stretch, and you may end up with a bag that gets taller and floppier over time. If you do use acrylic, line the bag and reinforce the base, and I will show you how.
For the cream body and straps, you will need roughly five hundred yards. For the red cap, plan on about three hundred yards. For the green grass base, one hundred and fifty yards is plenty, and you will want a few extra yards of a slightly darker green for the leaves. The door and window frames use about one hundred yards of two brown shades, a warm chestnut for the door and a deeper chocolate for the arch around it. You will also need small amounts of sky blue for the windows, bright white for the spots and flower petals, and a little yellow for the flower centers.
For tools, I used a 3.5 millimeter hook, which is a size E or four in the US. That is smaller than the label on the yarn suggests, and that is on purpose. A tight gauge makes a sturdy bag with no gaps. Beyond the hook you need stitch markers, a tapestry needle, sharp scissors, and a pair of adjustable slide buckles for the straps, in a width of one inch. I used antique brass ones because they match the cottage look, but silver or black would also be lovely. A small brass shank button makes a perfect door knob. For the inside, I recommend a firm piece of plastic canvas or a thin cutting board cut into a circle for the base, a length of cotton cord for the drawstring, and about half a yard of lining fabric if you want the bag to be fully finished inside.
Finally, you will want a handful of polyester fiberfill for the mini mushrooms and a few small scraps of the other colors for the embellishments. That is a long list, but most of it is small stuff you may already have at home.
A Note About Size and Gauge
The finished backpack stands about eleven inches tall including the cap, and it is about ten inches across at its widest point. These measurements will shift a little with your tension, and that is fine. What matters is that your fabric is dense and firm, with no gaps big enough to see through. If you can poke a finger through a stitch, go down a hook size.
Step One: The Green Grass Base
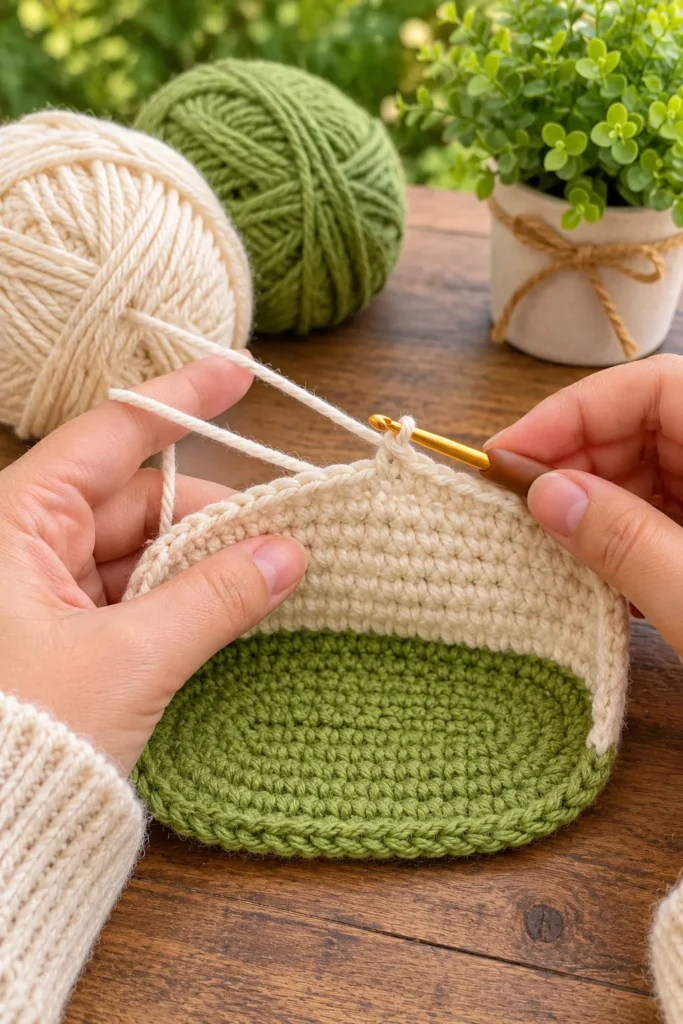
Every house needs a foundation, and this one starts with a circle of grass. Using the green yarn, make a magic ring and work six single crochet into it. Pull the ring tight, and place a stitch marker in the first stitch. Because we work in a continuous spiral, do not join the rounds, and move the marker up with each round.
For the second round, work two single crochet in every stitch around, for twelve stitches. For the third round, work one single crochet and then an increase, and repeat around, for eighteen. For the fourth round, work two single crochet and then an increase, for twenty four. Keep going in this pattern, adding one more plain stitch between increases in every round, until you have sixty six stitches in round eleven. You now have a flat circle roughly nine inches across.
For round twelve, work in the back loops only, one single crochet in each stitch. This creates a clean corner where the flat base turns into the walls of the bag. Then work three more rounds of plain single crochet, one in each stitch, to build the grass wall. You should now have a shallow green bowl.
Now for the grassy edge. In the last green round, work this stitch group around: single crochet, half double crochet, double crochet, half double crochet, single crochet, and slip stitch. That group covers six stitches, and you will repeat it eleven times for a total of sixty six. When you finish, you will see a row of soft green peaks, just like blades of grass. This is the detail that makes the base look like a real garden, and you can see it clearly in the work in progress photo. Do not cut the green yarn yet, in case you need to adjust the edge, but you can carry it up the inside if you want to.
If your peaks look uneven, do not worry. Real grass is never uniform, and a slightly wild edge looks more natural. The only thing to watch is that every group has the same number of stitches, so the final round comes out even.
Step Two: The Cream Cottage Body
Switch to the cream yarn, and work into the stitches of the last plain green round, tucking your hook into the valleys between the peaks. This is a little fiddly for the first few stitches, but once you get started the rhythm takes over. Work one single crochet in each stitch around, keeping your sixty six stitches. The peaks will naturally sit in front of the cream and give you that lovely layered effect.
Continue in plain single crochet for eight rounds. This builds the lower walls of the cottage. In the next round, add six evenly spaced increases to reach seventy two stitches, and then work fifteen more plain rounds. This gives the body a gentle belly, which is what makes it look like a real mushroom stem and gives you extra room for your things.
Now the body starts to taper toward the cap. Work one round decreasing six stitches evenly, for sixty six stitches, then five plain rounds. Work one more round decreasing six stitches, for sixty, and then five plain rounds. Your bag should now look like a rounded barrel with a slightly narrower top, and it should stand up on its own if your yarn is firm enough.
For the drawstring channel, work one round of single crochet, then a round of chain two, skip two stitches, and single crochet in the next stitch, repeated around, which makes a ring of little holes. Finish with a plain round of single crochet over those chains, and you have a neat eyelet ring. A cord threaded through these holes will pull the top closed. Cut the yarn and weave in the end.
Step Three: The Red Mushroom Cap
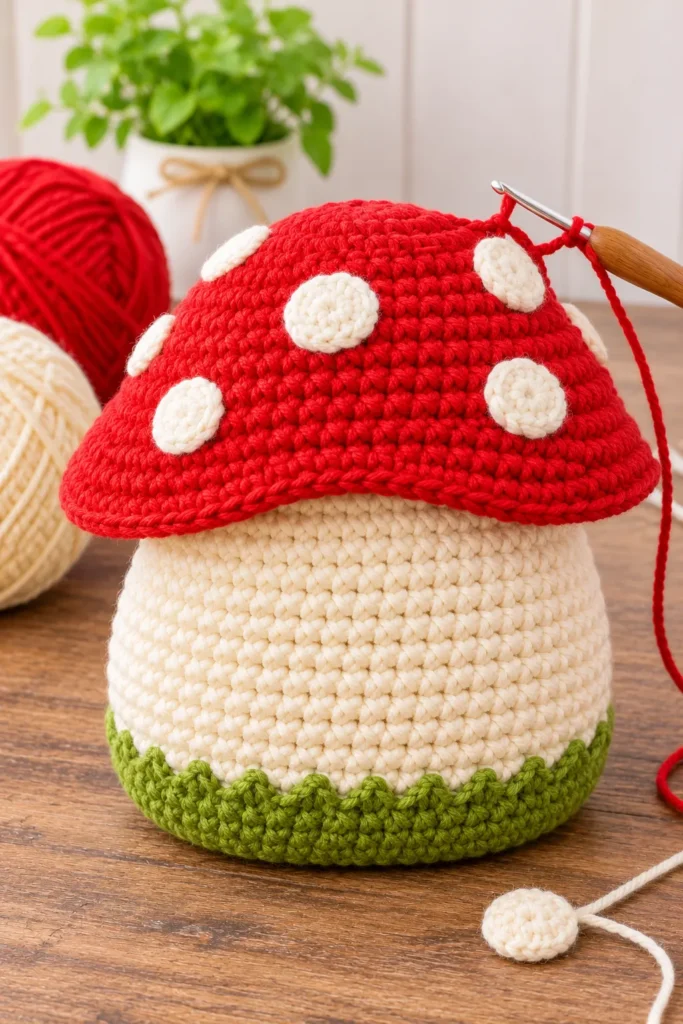
The cap is the part everyone notices first, so it deserves a little extra care. Use the red yarn, and begin with a magic ring and six single crochet. Increase evenly in every round, adding six stitches each time, until you reach sixty stitches in round ten. This builds a flat circle, and the next stage turns it into a dome.
From round eleven, we add stitches more slowly so the fabric begins to curve. Work round eleven plain. In round twelve, add six increases to get sixty six, then work a plain round. In round fourteen, add six increases to get seventy two, then a plain round. In round sixteen, increase to seventy eight, then a plain round. In round eighteen, increase to eighty four, then a plain round. In round twenty, increase to ninety, then work five plain rounds at ninety stitches.
Finish the cap with a round of slip stitches, working through the front loops only. This produces a firm, rope like edge, just like the one in the photos, and it helps the cap keep its curve. Do not pull the slip stitches too tight, or the edge will pucker. If it does, loosen the tension slightly and try again.
You may notice that the cap seems very wide compared to the body. That is exactly what we want. A mushroom cap overhangs its stem, and that overhang is what gives the bag its charming silhouette. It also keeps rain off the door, which is practical in a very imaginary way.
Making the Spots
The cream spots are the most fun part of the cap, and you can make them as many or as few as you like. I used seven, in three different sizes, and I placed them a little unevenly so the cap looks natural.
For a small spot, make a magic ring with six single crochet, increase around to twelve, and finish with a slip stitch. For a medium spot, add a third round of one single crochet and an increase repeated around, for eighteen stitches. For a large spot, go one more round, with two single crochet and an increase repeated, for twenty four. Leave a long tail on each spot for sewing.
Pin the spots onto the cap before you sew them. Move them around until you like the arrangement, then stitch them down with small, snug stitches around the edge. I recommend sewing slightly inside the edge of each spot, so the thread disappears into the texture. A little tug as you finish gives the spots a gentle puffy look, which I love.
Joining the Cap to the Body
Now we turn the cap into a lid. Place it on top of the body, with the cap overhanging evenly all around. Using the red yarn and a tapestry needle, sew the back half of the cap to the back half of the body, using a series of small stitches along the inner rim of the cap. Leave the front half free, so the cap lifts like a lid and gives you access to the inside.
This is the stage where the bag really begins to feel alive. I remember holding it up for the first time and realizing it actually looked like a little house. If you want extra stability, add a few more stitches at the back corners, and stitch a small flat button on the inside of the cap and a loop on the body, which gives you a simple closure.
Step Four: The Arched Door
The door is the heart of this design. It sits in the center of the front, just above the grass, and everything else is arranged around it.
With the chestnut brown yarn, chain fourteen. Work single crochet in the second chain from the hook and in each chain across, for thirteen stitches. Work in rows, and use the back loop only on every row, to create a ribbed texture that looks just like wooden planks. After ten rows, begin shaping the arch. Decrease one stitch at each end for the next two rows, then work one more plain row. This gives the top its rounded corners.
Now take the chocolate brown yarn and work a border around the entire door. Begin at the bottom left corner, and work single crochet around the sides and top, placing three stitches in each upper corner so the arch curves smoothly. Finish with a round of slip stitches for a rope like frame. The darker color gives the door depth and makes the lighter planks stand out.
Sew the door to the body, centered over the grass, using small stitches along the edge of the frame. Add the tiny brass button as a door knob, placing it slightly to one side at about mid height. If you want the door to feel more realistic, embroider two straight lines across the top of the door with a thin brown thread, and a short line down the middle, to suggest a tiny window frame. A little detail like that makes the door look like it came from a real cottage.
Step Five: The Little Blue Windows
The windows add color and personality, and they are easier than they look. With the sky blue yarn, make a magic ring with six single crochet, then increase to twelve. Work one round of one single crochet and an increase, for eighteen, and then pull the circle gently into an oval by sewing it down with a slightly stretched shape.
Using the chocolate brown yarn, work a round of slip stitches around the outside of the oval to create the frame. Then, using a thin brown thread, embroider a cross over the window to make the panes. Make one long vertical stitch and one horizontal stitch, and anchor each with a tiny stitch at the crossing. The result is a charming arched window that looks like it belongs in a storybook.
Place one window on each side of the door, slightly higher, and tilt them very slightly outward. I like to sew them on after the door, because it is easier to judge the spacing. Under each window, add a tiny flower box made of leaves and flowers, which I will show you how to make in a moment.
Step Six: Leaves, Flowers, and Mini Mushrooms
The small details are what make this bag look like a living garden. None of them are difficult, but there are many, so I suggest making them while watching a movie or listening to a podcast.
For the leaves, use two shades of green. Chain six, slip stitch in the second chain from the hook, single crochet in the next, half double crochet in the next, single crochet in the next, and slip stitch in the last. Fasten off, leaving a tail. Make about twenty leaves, and vary the size slightly by adding or removing a chain. Sew them in groups of three to five, arranged along climbing vines on the walls and tucked under the windows.
For the flowers, use white yarn. Make a magic ring and work five petals, each made of one slip stitch, one chain, one double crochet, one chain, and one slip stitch into the ring. Pull the ring closed, and then sew a small yellow French knot into the center. Make about eight of these, and scatter them around the grass, windows, and door, tucking some among the leaves.
For the mini mushrooms, use red for the cap, cream for the stem, and white for the dots. Make a magic ring in red, work six single crochet, then increase to twelve, then one single crochet and an increase repeated for eighteen. Work one plain round, then a round of single crochet in the back loops only, and fasten off. For the stem, make a magic ring in cream with six single crochet, work four plain rounds, and stuff lightly. Sew the stem to the underside of the cap, then embroider tiny white dots on top with small stitches. Make two or three, and sew them to the grass at the base, one on each side of the door.
Take your time placing these pieces. I move them around for a good fifteen minutes before I sew anything down. It sounds fussy, but the arrangement is what gives the bag its personality, and a little patience pays off.
Step Seven: The Straps and Handle
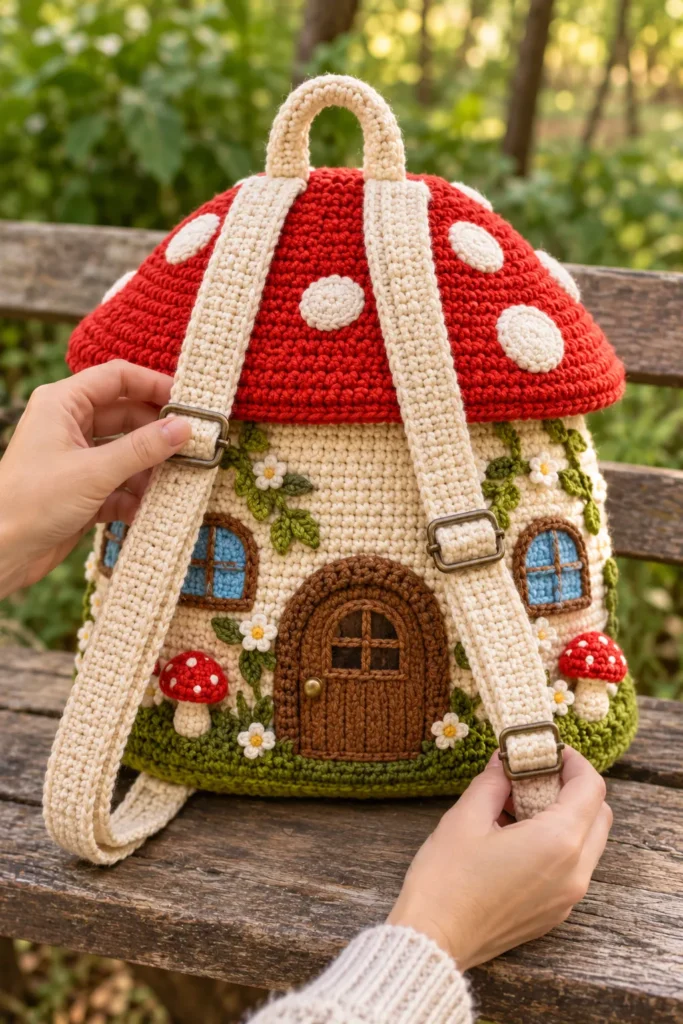
A cute backpack still has to be comfortable, so do not rush the straps. Use the cream yarn, and chain twelve. Work single crochet in the second chain from the hook and in each chain across, for eleven stitches. Chain one, turn, and work single crochet in every stitch across. Continue until the strap measures about thirty two inches, or longer if you want more adjustment.
To make a sturdy strap, I like to work the first and last stitch of each row in the back loop only, which creates a neat ridged edge and a slightly stiffer fabric. If you want even more strength, sew a strip of cotton webbing or grosgrain ribbon along the back of each strap, which stops it from stretching under the weight of your belongings.
Make two straps, and fit each one with a slide buckle. Thread the end through the buckle, fold it back about three inches, and sew it down firmly with several rows of stitches. Make sure to go through all layers, and reinforce the stitching with a second pass, because this is the part that bears the load. If your bag will carry heavy things, add a small square of felt behind the stitching for extra strength.
For the top handle, chain nine and work single crochet rows until the handle is about ten inches long, then fold it in half lengthwise and sew the edges together, which gives you a thick, rounded handle. Attach it to the top center of the cap, using the same cream yarn, and stitch it in several places so it does not tear off.
Attach the top of each strap to the back of the bag, just below the edge of the cap, about three inches apart. Attach the bottom of each strap to the back of the base, close to the edge of the grass. Try the bag on before sewing the lower ends, and adjust their position until the bag sits comfortably between your shoulder blades. A good fit makes a big difference.
Step Eight: Lining and Finishing
A lining is optional, but I strongly recommend it. Crochet fabric has little holes, and even tight stitches will let small items slip through, like coins or earbuds. A lining also helps the bag keep its shape and protects the inside from snags.
Cut a piece of cotton fabric in a rectangle that matches the height and circumference of the body, plus half an inch for seams. Sew the short ends together to make a tube, then sew a circle for the base. Slip the lining inside the bag, fold the top edge under, and stitch it to the inside of the drawstring channel. Insert your circle of plastic canvas or cutting board into the bottom, covered with a layer of fabric, which gives the bag a flat, stable base.
Thread the cotton cord through the eyelet ring, and tie the ends together or knot them with a pretty wooden bead. When you pull the cord, the top gathers neatly beneath the cap. Finally, weave in all ends, trim any loose threads, and give the whole bag a light steam to relax the stitches.
Common Problems and How to Fix Them
If your cap looks pointy instead of round, you are probably adding too few increases at the start. Check that you have sixty stitches in round ten, and do not skip any rounds. If it looks flat like a pancake, you are adding too many, and you should remove a round and reduce the increases.
If the body leans to one side, the increases may be stacking in the same place. Spread them out by shifting each increase a stitch or two from the previous round. This makes the shape rounder and more even.
If the straps stretch, line them with ribbon or webbing, and use a smaller hook. Cotton stretches a little with use, and a reinforced strap will last far longer.
If the door looks crooked, remove it, block it flat with a damp cloth, and sew it on again with pins. Most crooked doors are really just uneven edges, and blocking fixes them.
Color Variations to Try
I made the classic red and cream version, because it feels like the picture book original. But this pattern is beautiful in almost any palette. A dusty pink cap with white dots and a sage green body would make a soft spring cottage. A deep purple cap with cream dots and a charcoal body would be a lovely witchy version for Halloween. A mustard cap with brown dots and an earthy tan body feels like an autumn forest.
You can also change the details to suit your own story. Swap the door for a round hobbit style one, add a tiny chimney, or crochet a little lantern beside the door. Add a snail in the grass, a butterfly on the cap, or a string of tiny bunting across the windows. The more personal, the better.
Making It Smaller or Larger
If you want a mini version, use sport weight yarn and a 2.5 millimeter hook, and reduce the base to forty eight stitches. It makes an adorable kids bag or a pouch for small treasures. For a larger market bag, use bulky yarn, a 5.0 millimeter hook, and increase the base to eighty four stitches, with a taller body. Scale the cap to match, adding extra rounds as needed.
Caring for Your Backpack
Cotton is wonderfully easy to care for. Spot clean with a damp cloth and a drop of mild soap, and let it air dry. If it needs a full wash, place it in a pillowcase, use a gentle cycle with cold water, and reshape it while damp. Do not tumble dry, as heat can shrink cotton and distort the shape. Once dry, stuff the bag with tissue or a towel to keep its form during storage.
Avoid hanging the bag by the straps for long periods when it is heavy, because that can stretch them. Instead, set it on a shelf or hang it by the top handle on a strong hook.
A Few Words Before You Begin
I will be honest with you. This is not a one evening project. It took me about three weeks of casual crocheting, a few hours at a time, and there were moments when I wondered if I was crazy for starting it. But every part of it is simple, and when you break it into small pieces, it becomes surprisingly manageable. Make the base one night, the body another, the cap the next, and then spend a few relaxed evenings on the details.
The best part is the moment you put everything together. The first time I set the cap on the body and saw the little door looking back at me, I actually laughed out loud. It felt like I had made something that belonged in a different world, and then I got to carry it into this one.
So pick your colors, put on some music, and give it a try. Do not worry about perfection. Handmade things are always a little wonky, and that is exactly what gives them heart. I would love to see your version, so please share a photo and tell me which little details you added. Every mushroom house has its own story, and I cannot wait to hear yours.
Happy hooking, and may your cottage always have a warm light in the window.