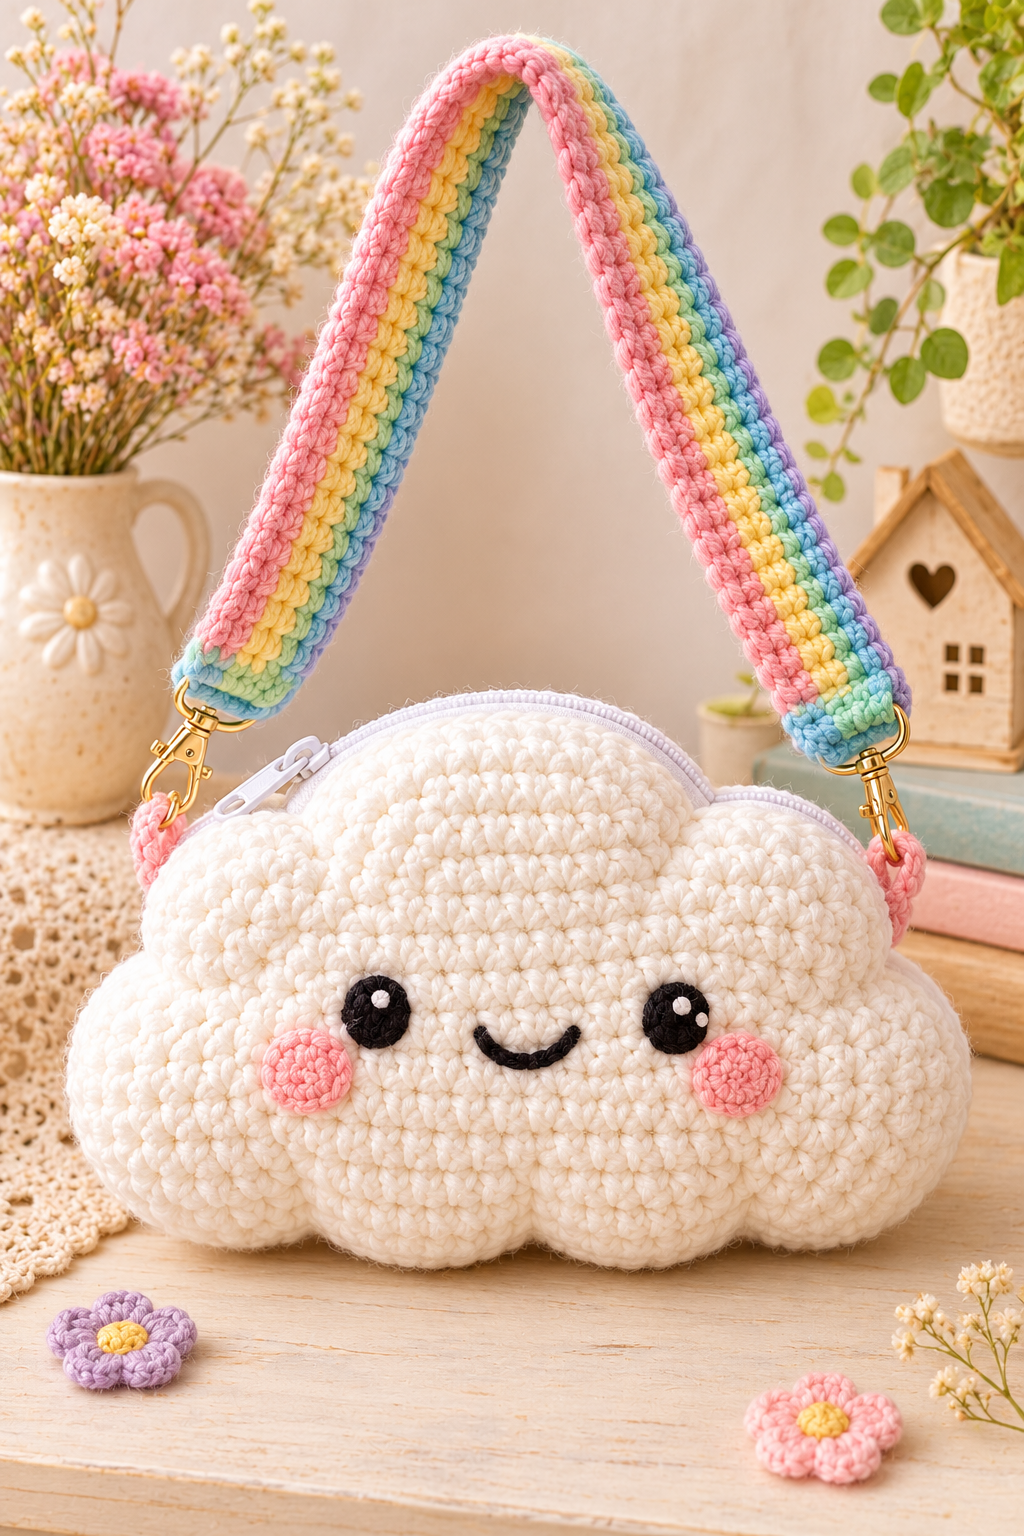
There is a certain kind of project that makes you smile before you have even finished it. For me, this cloud purse is exactly that. The moment the little black eyes and pink cheeks went on, the whole thing looked back at me with such a happy face that I laughed out loud at my kitchen table. It is soft, round, puffy, and a little bit silly, and it carries a rainbow on its shoulder strap. If a bag can feel like a good mood, this one does.
I made it as a small crossbody purse, big enough for a phone, a lip balm, a few cards, and a set of keys. It has a zipper along the top so nothing falls out, a detachable rainbow strap with gold clasps, and a fully embroidered kawaii face. It works as a fun everyday bag, a cute gift for a daughter or niece, a spring festival accessory, or even a charming little case for your crochet supplies. Once you make one, I promise you will want to make a second in a different color.
In this guide I will walk you through everything, from choosing yarn to shaping the cloud, adding the zipper, stitching the face, and building the rainbow strap. I will also share the small things I learned while making mine, like how to keep the scalloped edge smooth and how to stop the zipper from puckering. If you can crochet in rows and sew with a yarn needle, you can make this purse.
Why a Cloud Makes the Perfect Purse
A cloud is a surprisingly practical shape for a bag. The rounded bumps give it a soft outline that does not show uneven edges, which makes it very forgiving for beginners. The flat front gives you a perfect canvas for a face, and the wide bottom gives enough room inside for your essentials. There are no tricky corners, no complicated shaping, and no hard to reach seams.
It also photographs beautifully. White yarn catches the light and shows off every stitch, and pastel accents like pink cheeks and a rainbow strap give you a gentle color story that works on any background. If you sell handmade items, this is the kind of design that gets saved and shared, because people love anything that looks sweet at first glance.
Choosing Your Yarn and Tools
Because this is a bag, durability matters. I used a smooth mercerized cotton in a worsted weight, and I strongly recommend something similar. Cotton keeps its shape, resists pilling, and gives you a firm, tidy fabric that holds up to daily use. A soft acrylic can work too, but it tends to stretch and fluff, and you may notice the cloud losing its shape after a few weeks of carrying it. If you only have acrylic, add a lining, and your bag will stay crisp.
For the white cloud, you will need about two hundred and fifty yards of yarn. For the face you need only small scraps, a little black for the eyes and smile, a little pink for the cheeks, and a tiny bit of white for the eye highlights. For the rainbow strap, you will need small amounts of five pastel colors, which are a soft pink, a buttery yellow, a mint green, a baby blue, and a gentle lilac. Fifty yards of each is more than enough. A small amount of extra pink is also needed for the little loops that hold the clasps.
For the hook, I worked with a 3.5 millimeter hook, which is a size E or four in the US. That is a little smaller than the yarn label recommends, and that is deliberate. A tight gauge gives you dense fabric that does not show the lining and keeps the bag sturdy. You will also need a tapestry needle, a few stitch markers, sharp scissors, and a white zipper about eight inches long. A nylon coil zipper is easiest to sew, and white blends invisibly with the yarn. For the strap, you will need two gold swivel lobster clasps, and for the loops, two small D rings or just the pink crocheted tabs I will show you how to make.
If you want a fully lined bag, which I recommend, grab a half yard of cotton fabric in a cute print or a plain white, along with matching thread and a needle. A lining makes the purse feel professional, and it keeps small items from slipping through the stitches.
Gauge and Size
My finished cloud measures about eight inches wide and five and a half inches tall, with a flat depth of about one inch when it is filled. These numbers will change a little with your tension, and that is perfectly fine. The only thing that really matters is that your fabric is firm and your two panels match in size. If your panels come out different sizes, the zipper will pucker, and the bag will look uneven.
I recommend making a quick paper template before you begin. Draw a cloud shape on a sheet of paper, about eight inches wide, with one big bump in the middle and two smaller bumps on the sides, and a gently rounded bottom. As you crochet, hold your work up against the paper to check the shape. It sounds old fashioned, but it saves a lot of ripping back later.
Step One: Crocheting the Cloud Panel
The cloud is made from two identical panels, a front and a back, each worked flat in rows of single crochet. We will build the shape from the bottom up, adding a few stitches to make the sides round and then forming the three bumps at the top.
Start with the white yarn and chain forty one. Work a single crochet in the second chain from the hook and in each chain across, for forty stitches. Chain one, turn, and work one single crochet in each stitch across. Repeat for one more row, so you have three rows in total.
For the next two rows, increase one stitch at the beginning and end of each row. Work two single crochet in the first stitch, one single crochet in each stitch across until the last stitch, and work two single crochet in the last stitch. After these two rows you will have forty four stitches. This is what rounds out the lower corners and gives the cloud its soft, wide belly.
Now work six plain rows of single crochet, with forty four stitches in each row. Keep your edges straight and your tension even. This is the long, relaxing middle part of the panel, and it is a perfect time to catch up on a podcast.
Next, begin shaping the shoulders. For the next two rows, decrease one stitch at each end, by working two stitches together at the start and end of the row. You should have forty stitches after these rows. This rounds off the upper corners and prepares the base for the three bumps.
Making the Three Bumps
The bumps are what turn a rounded rectangle into a cloud, and they are easier than they look. Each one is a small section worked in short rows, using the stitches you already have on the hook. Mark your three sections with stitch markers so you do not lose your place.
For the left bump, work single crochet across the first twelve stitches of the row, then turn. Work eight rows over these twelve stitches only, decreasing one stitch at each end in the last two rows. This gives the bump a rounded top. Fasten off.
For the center bump, which is the biggest, join the yarn at the thirteenth stitch of the base row. Work single crochet across the next eighteen stitches, then turn. Work ten rows on these eighteen stitches, and decrease one stitch at each end in the last three rows so the top becomes nicely rounded. Fasten off.
For the right bump, join the yarn at the thirty first stitch and work across the remaining ten stitches. Work seven rows, decreasing one stitch at each end in the last two rows. Fasten off, and weave in your ends.
Now it is time for the edging, which gives the cloud its smooth, scalloped outline. Join the white yarn at the bottom corner, and work a round of single crochet all the way around the entire panel, placing two single crochet in each corner and in the inside curves between the bumps so the edges lie flat. When you get back to the start, slip stitch to join, and then work a final round of slip stitches in the back loops only. This produces a tidy, braided looking edge, just like you can see in the photo.
If your edge starts to ruffle, you are adding too many stitches in the curves. If it pulls and puckers, you are not adding enough. Adjust your stitches until the edge lies flat, and remember that you can block the panel gently with steam to smooth out small bumps.
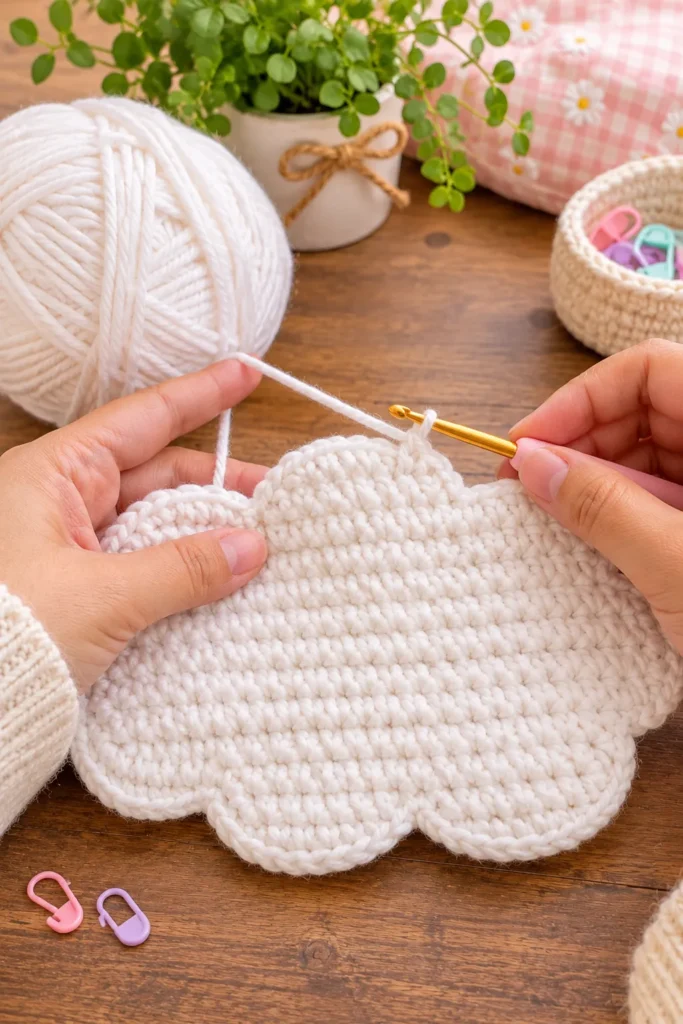
Make a second panel exactly the same way. I like to make both panels one after another, so my tension stays consistent, and I count my rows carefully. When you finish, lay the two panels on top of each other and check that they match. If one is slightly larger, block it into shape with a damp cloth and a little patience.
Step Two: Block Your Panels
Blocking is not glamorous, but it is the difference between a bag that looks homemade in a bad way and one that looks beautifully handmade. Lay your panels on a flat surface, pin them to match your paper template, and gently steam them without touching the iron to the yarn. Let them dry completely.
Cotton responds really well to blocking, and you will notice the scalloped edges relax into smooth, even curves. The surface of the fabric also becomes smoother, which makes the face embroidery easier later on.
Step Three: Embroider the Face Before Assembly
This is a tip I learned the hard way. Add the face to the front panel before you sew the bag together. It is much easier to work on a flat surface than on a stuffed or zipped bag, and you can place the features exactly where you want them.
Start with the eyes. With black yarn, make a magic ring, work six single crochet, then increase in each stitch for twelve, and then one single crochet and an increase repeated around for eighteen. Fasten off with a long tail. Make two of these. For the highlights, make two tiny white circles by working a magic ring with six single crochet, and then sew one onto each black eye, slightly up and to one side, to give the eyes a sparkling look.
For the cheeks, use pink yarn and make two circles in the same way, with a magic ring, six single crochet, an increase round for twelve, and an extra round for eighteen. Make them slightly larger than the eyes, or about the same size, depending on your taste. I like soft, round cheeks that look like a gentle blush.
Place the eyes about two inches apart, and slightly below the center of the cloud. Pin them in position and check from a distance. Then place the cheeks just outside and slightly below the eyes. Step back, tilt your head, and adjust until the face feels right. Small shifts in spacing change the personality dramatically, so take your time.
Sew each piece down with small, snug stitches around the edge, hiding your needle in the texture of the fabric. For the smile, use a length of black yarn and a tapestry needle. Make a small curved stitch between the eyes, about an inch wide, and anchor it with tiny stitches along the curve. Keep the curve gentle, and you will get a sweet, contented smile.
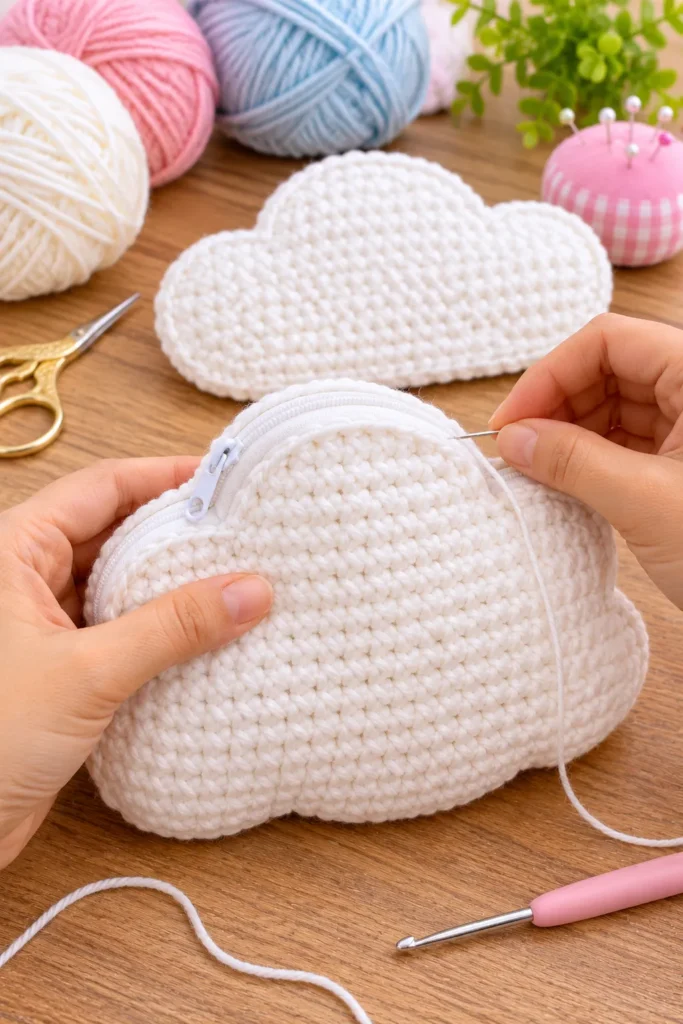
A small piece of advice about the smile. If you are nervous about getting it right, draw it lightly with a washable fabric marker first, or lay a piece of yarn on the fabric and move it around until you like the shape. Once you are happy, stitch over it. It takes the fear out of the step.
Step Four: Adding the Zipper
The zipper is the part that scares people the most, but it is really just careful sewing. Take your time, use plenty of pins, and sew slowly. The zipper goes along the top edge of the cloud, following the curve of the three bumps, so choose a zipper slightly longer than the width of the top.
First, close the zipper and pin it to the top edge of the back panel, on the wrong side, with the teeth facing outward. Follow the curve of the bumps and ease the zipper into the shape. Because the zipper is straight and the edge is curved, you will have to gently stretch and fold the tape, and that is perfectly normal. Pin every half inch.
Using white thread and a small needle, sew the zipper tape to the edge of the panel with a backstitch, going through the back loops of the edging round. Make small, even stitches, and keep them close to the zipper teeth. When you reach the end, trim the extra zipper tape and fold the ends under.
Now pin the other side of the zipper to the front panel in the same way. Match the curves carefully, and make sure the two panels line up at the corners. Before sewing, open and close the zipper once to check that it works smoothly, and adjust the pins if it catches. Then sew the second side, working slowly.
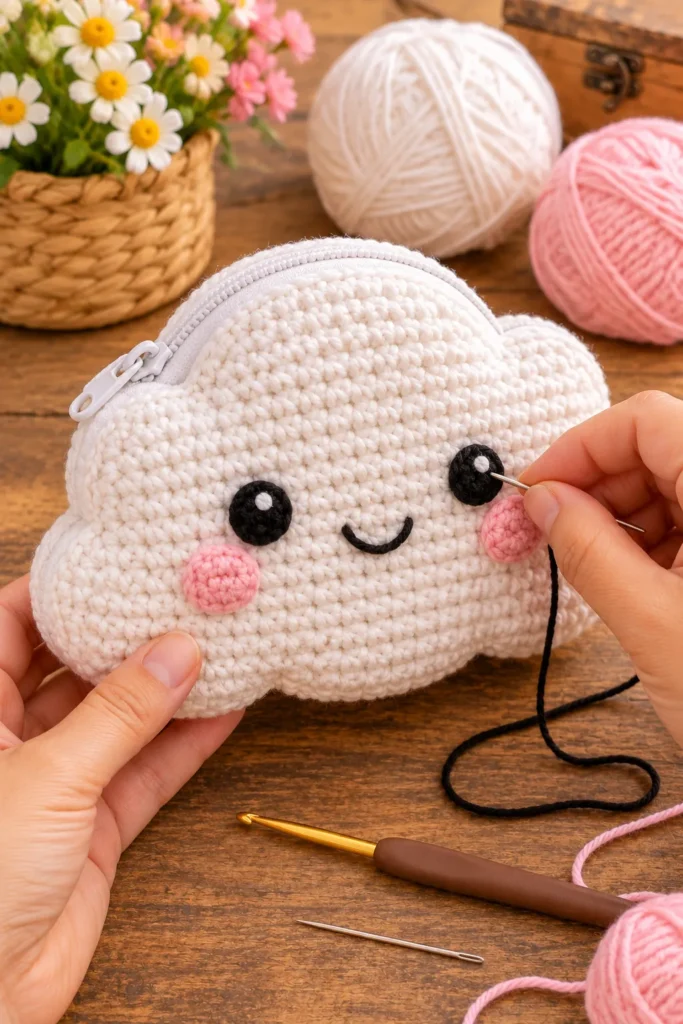
When both sides are attached, open the zipper halfway so you can turn the bag right side out later. Then pin the front and back panels together around the remaining edges, with the wrong sides facing in, and join them with a slip stitch or whip stitch through both edging loops. Work in small, even stitches, and be careful not to pull too tight, because tight stitches create a puckered edge.
If you prefer a crocheted join, work a round of single crochet through both panels, placing a stitch in each stitch of the edging. This creates a firm, slightly raised seam that gives the bag extra stability. I did a mix of both, using the whip stitch around the curves and a crocheted join along the bottom, and I liked the result.
Step Five: Adding a Lining
I know, I know, lining feels like extra work. But a lining changes the whole feel of the bag. It keeps small items from slipping through the stitches, adds structure, and protects the crochet from wear. If you are making this as a gift or to sell, a lining is worth it.
Use your crocheted panels as a template. Lay a panel on your fabric, trace around it with a pencil, and add a quarter inch seam allowance all around. Cut two pieces of fabric. Place them together with right sides facing in, and sew around the edge, leaving the top open. Clip the curves so the lining sits flat, and turn it right side out.
Slide the lining inside the bag, with the wrong side facing the crochet, and fold the top raw edge under. Pin the folded edge to the zipper tape, and sew it down with tiny invisible stitches. When you finish, the inside will look clean and neat, and you can use the zipper without catching any threads.
Step Six: The Rainbow Strap
Now for my favorite part. The rainbow strap makes this purse unforgettable, and it is a simple project in itself, just a long strip of single crochet in five stripes.
Using the pink yarn, chain one hundred and forty. This makes a strap about thirty six inches long, which sits comfortably across the body for most adults. If you want a shorter strap, chain fewer stitches, and if you want a longer one, add more. Single crochet in the second chain from the hook and in each chain across. Chain one, turn, and work another row of single crochet. That gives you two rows of pink.
Change to yellow, and work two rows of single crochet. Change to mint green and work two rows. Then baby blue for two rows, and finally lilac for two rows. To change colors cleanly, pull the new color through on the last yarn over of the last stitch in the previous row, so the stripes look crisp. Carry nothing, and weave in the ends as you go if you can, which will save you from a mountain of tails at the end.
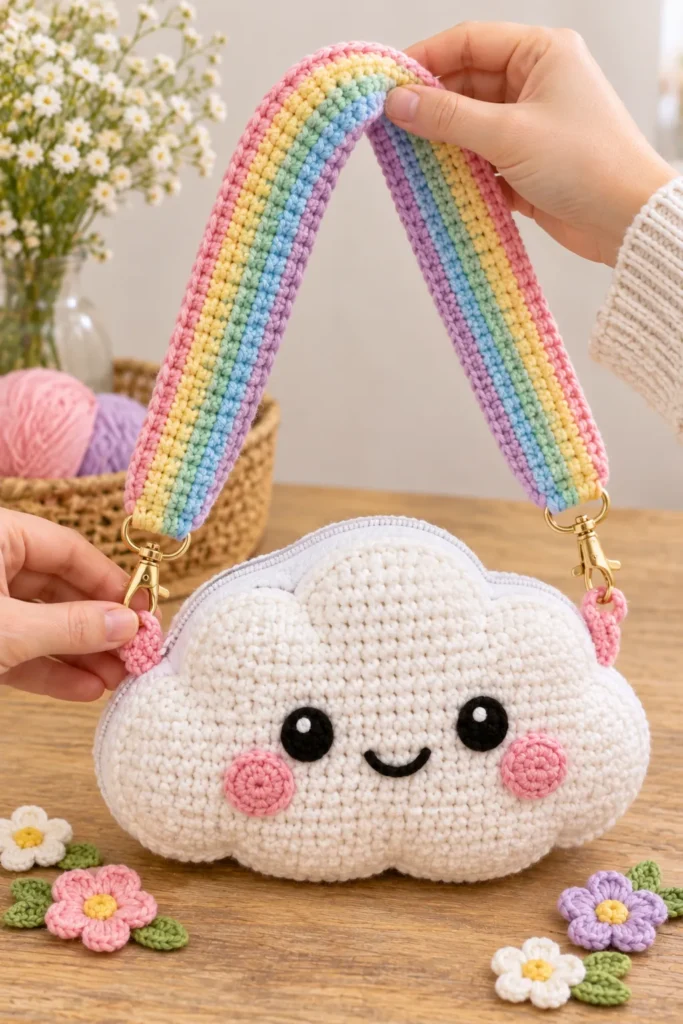
When you finish the last lilac row, work a round of single crochet around the entire strap, with three stitches in each corner, in the lilac yarn. This gives the strap a smooth border and stops it from curling. Fasten off and weave in all ends. You can see the finished result in the photo, with the colors stacked in a soft, pastel arc.
Because the strap is made of cotton, it can stretch a little over time. To prevent this, sew a strip of ribbon or cotton webbing along the back of the strap, or fold it in half lengthwise and stitch the edges together, which makes a thicker, stronger strap. I did the second method on mine, and it makes the strap feel much more substantial.
Making the Pink Loops
The strap attaches to the bag through two small pink loops, which sit at the sides of the cloud. With pink yarn, chain ten, and work a row of single crochet across for nine stitches. Work three more rows, then fold the piece in half so the short ends meet, and sew them together to form a loop.
Make two loops. Sew each one firmly to the side seam of the bag, near the top, just below the zipper. Use several rows of stitches, and go through the lining too if you can, because this is where the weight of the bag will pull. If you want extra strength, add a small piece of felt under the loop before sewing.
Attaching the Clasps
Slide a gold lobster clasp onto each end of the strap. Fold the strap end back about one inch, and sew it down with strong thread, making several rows of stitches. Reinforce the stitching with a second pass, because this is a stress point. Then clip each clasp onto a pink loop, and your bag is ready to wear.
A detachable strap is a wonderful feature, because you can swap it for a different one, or use the bag as a clutch when you want. I have already made a second strap in a plain cream color for a more neutral look.
Common Problems and How to Fix Them
If your cloud looks lopsided, check that both sides of each panel have the same number of stitches in every row. Uneven edges usually come from a missed stitch at the end of a row, and a stitch marker in the first stitch of each row helps you avoid it.
If the bumps look pointy instead of round, you are probably decreasing too quickly at the top. Try decreasing only in the last two rows, and add an extra row of plain stitches before you start. Rounder bumps need slow, gentle decreases.
If the zipper puckers, the panels may be slightly different sizes, or you may have stretched the zipper tape while sewing. Take out the stitches, relax the tape, and sew again with more pins. A little patience here makes a big difference, and nobody sews a perfect zipper the first time.
If the face looks off, do not panic. Faces are very forgiving, and moving a cheek a quarter inch or adjusting the smile can change the whole mood. If you are not happy, cut the stitches and try again. It is only yarn, and it can always be redone.
If the strap twists, make sure your foundation chain does not twist before you begin the first row. Lay it flat on a table, and check it before you start crocheting.
Color Ideas and Variations
White is the classic choice, but this cloud looks great in many colors. A soft lavender cloud with a pink and cream strap feels dreamy. A pale blue cloud with a white and silver strap looks like a winter morning. A gray cloud with a bright yellow lightning bolt would make a fun stormy bag, and a pink cloud with a rainbow strap is pure sweetness.
You can also change the face. A sleepy face with closed eyes and tiny curved lashes looks adorable. A surprised face with a small round mouth is funny and cute. You can add a tiny bow, a pair of rosy freckles, or a few tiny raindrops hanging from the bottom. The more personality you add, the more people will love it.
For a seasonal twist, try a cloud with a snowflake for winter, a cloud with tiny flowers for spring, a cloud with a sun for summer, and a cloud with a few autumn leaves for fall. This pattern is a canvas, and you can paint it however you like.
Making It Bigger or Smaller
To make a mini cloud pouch, use sport weight yarn and a 2.5 millimeter hook, and reduce the base chain to twenty five. It makes a sweet coin purse or earbud case. To make a larger tote, use bulky yarn and a 5.0 millimeter hook, and increase the base chain to sixty. Scale the number of rows for each bump to match, and use a longer zipper.
If you want a deeper bag, add a gusset. Crochet a long strip about one inch wide and as long as the outline of the cloud, and sew it between the front and back panels, with the zipper set into the top section. This is a bit more work, but it gives you space for bigger things.
Caring for Your Cloud Purse
Cotton is wonderfully easy to care for. Spot clean with a damp cloth and a drop of mild soap, then let the bag air dry. If it needs a full wash, place it in a mesh bag and wash it on a gentle cycle in cold water, then reshape it while damp. Avoid the dryer, because heat can shrink cotton and warp the zipper.
Store the purse flat or stuffed lightly with tissue paper, so it keeps its shape. Keep it away from direct sunlight, which can fade the pastel colors over time. If the white gets a little dull, a soak in cool water with a gentle detergent usually brings it back.
Photographing Your Finished Purse
If you plan to share your work online, a few simple tricks will help you take lovely photos. Natural light from a window is the best, and a plain wooden table or a soft linen cloth makes a lovely background. Add a few props that match your color palette, like small flowers, a ball of yarn, or a ceramic cup. Hold the strap up so the rainbow arcs across the picture, and tilt the bag slightly so the face looks toward the camera.
Take photos at different angles, including a close up of the face, a shot of the zipper detail, and a picture of the strap. Pinterest loves tall, bright, simple images, so a portrait orientation works especially well.
A Few Last Thoughts
Making this purse was one of those quiet, happy projects that I did not want to end. There is something magical about watching a flat white panel turn into a character, and about adding a face and seeing it come to life. Every time I pick it up, the little smile makes me feel lighter.
If you are new to bags, this is a great place to start, because it teaches so many useful skills in one project. You learn how to shape in rows, how to join panels, how to sew a zipper, how to embroider a face, and how to make a sturdy strap. These skills will carry over into every bag you make afterward.
So gather your white yarn and your pastel scraps, put on your favorite music, and give it a try. Do not worry about perfection, because the best handmade pieces always have a bit of wobble in them, and that is part of their charm. I would love to see your version, so please share a photo and tell me which colors you chose. Every cloud has its own personality, and I cannot wait to meet yours.
Happy hooking, and may your days be soft, bright, and full of rainbows.