Every October I do the same thing. I pull out the box of fall yarn, light a candle that smells suspiciously like pumpkin bread, and tell myself I will only make one small decoration this year. Then I look at the marigold skein sitting on top of the pile and the plan falls apart. This little witch hat is the result of one of those evenings, and I am so happy with how it turned out that I wanted to write down every single step so you can make your own.
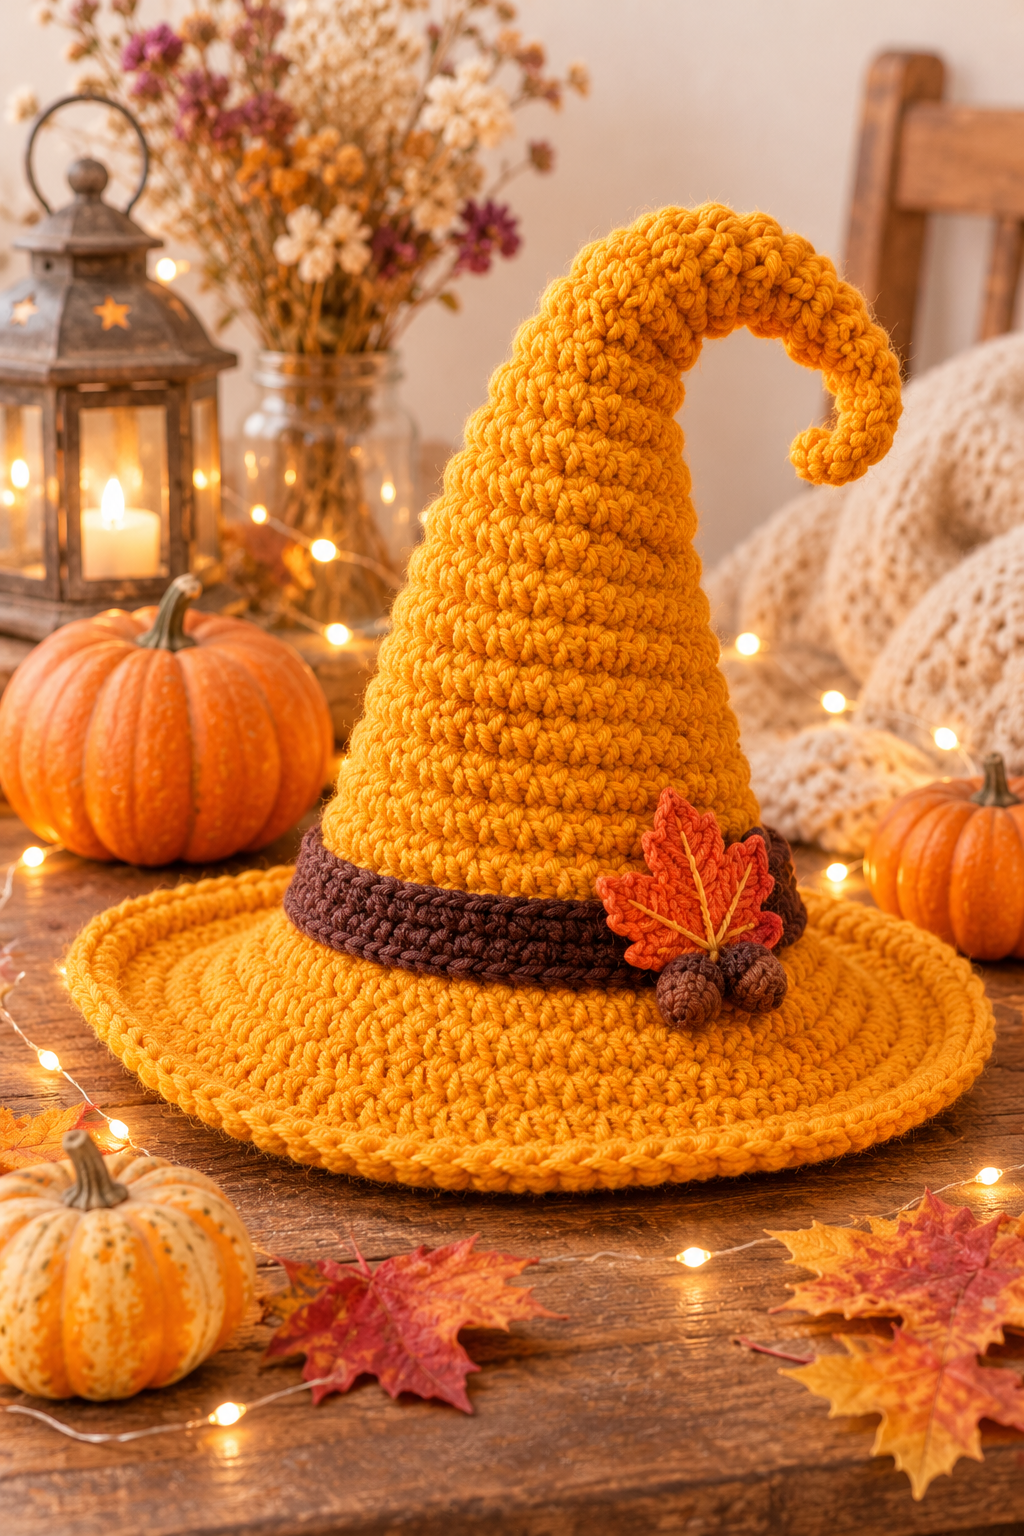
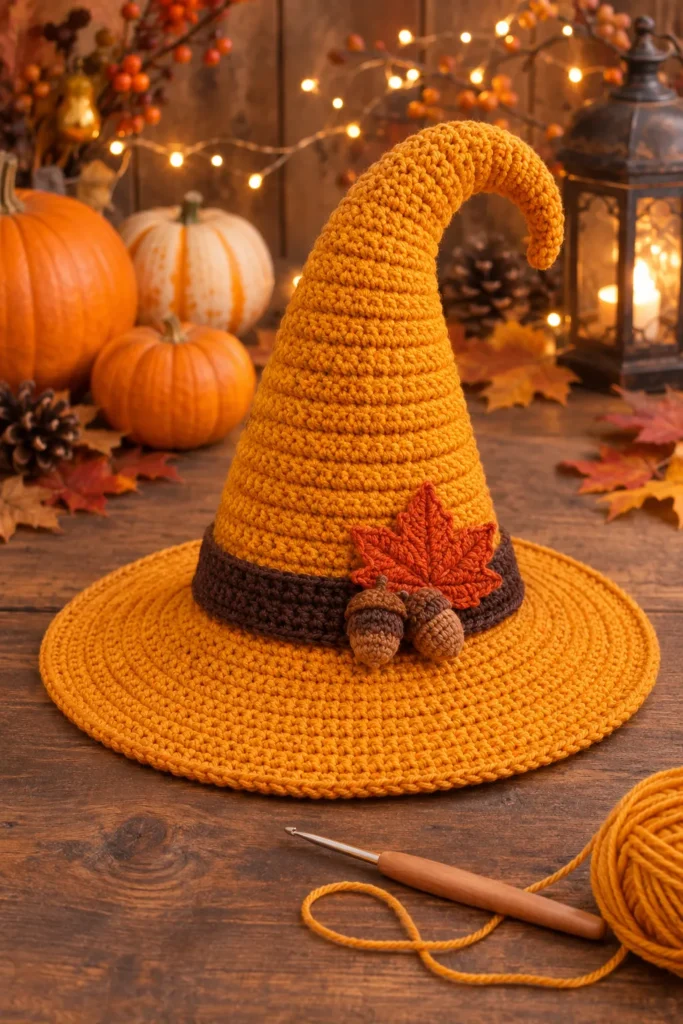
It is a standing crochet witch hat with a curled tip, a wide flat brim, a chocolate brown band, a rust colored maple leaf, and a pair of tiny acorns tucked at the front. It is not a hat you wear on your head. It is a decoration, the kind of thing that looks right at home on a mantel, a bookshelf, a porch table, or right in the middle of your Halloween tablescape next to a few real pumpkins. Because it is made with warm marigold instead of the usual black, it feels more like autumn than like a spooky costume, and that is exactly the mood I was after.
If you have never made a cone shaped project before, do not worry. A witch hat is really just a magic ring, a handful of increases, and a lot of relaxed single crochet. Once you understand how the shape grows, the rest is repetition. I will walk you through the yarn and tools first, then the cone, then the curled tip, the brim, the band, and the little embellishments that give the hat its personality. I will also share the mistakes I made along the way so you can skip them.
What You Will Need Before You Start
The first thing to talk about is yarn, because yarn decides almost everything about how this project behaves. I used a smooth worsted weight cotton blend in a rich marigold shade, and I would recommend something similar. A yarn with a little bit of body helps the cone stand up on its own, while a very soft, fluffy acrylic tends to slump and gives you a droopy hat that looks tired by the second day. If you only have soft yarn at home, you can still make this pattern, but plan to stiffen the finished hat a little, and I will explain how in the finishing section.
For the main color you will need roughly two hundred yards of marigold worsted weight yarn. The brown for the band takes much less, maybe forty yards. For the maple leaf you want a rust or burnt orange, and thirty yards is plenty. The acorns use two small scraps, one in a light caramel tan for the nut and one in a darker brown for the cap, so a few yards of each will do. I always keep a small bag of leftover browns and oranges for this kind of thing, and it is one of the nicest parts of crocheting seasonal pieces.
For the hook, I worked with a 4.0 millimeter hook, which is a G size in the US. This is smaller than the hook that the yarn label usually recommends, and that is on purpose. When you crochet a standing piece, you want the stitches tight and dense so the fabric is firm and no stuffing peeks through the gaps. If you normally crochet loosely, go down another half size. You will also need a 2.5 millimeter hook for the tiny acorns if you want them extra neat, though the same 4.0 hook works fine if that is all you have.
Beyond the yarn and hooks, gather a pair of sharp scissors, a yarn needle, a few stitch markers, a small bag of polyester fiberfill, and a piece of floral wire or a long chenille stem if you want the tip of the hat to hold its curl. A little fabric stiffener or a mix of white glue and water is optional but very helpful for the brim. Finally, a pair of small black or brown seed beads is not needed here, so ignore that if you saw it somewhere else. This hat is all about texture and color, not sparkle.
A Quick Word About Gauge and Size
The finished hat stands about nine inches tall from the base of the cone to the top of the curl, and the brim measures roughly eight inches across. Your numbers may differ a little depending on your yarn and your tension, and honestly that is fine. This is a decoration, not a sweater. If your hat comes out an inch shorter or wider than mine, nobody will ever know, and it will be just as cute.
If you want a bigger hat, add four or five more even rounds between each set of increases on the cone. If you want a smaller one, remove a few. The pattern is forgiving, which is one of the reasons I love it.
Step One: Start With a Magic Ring
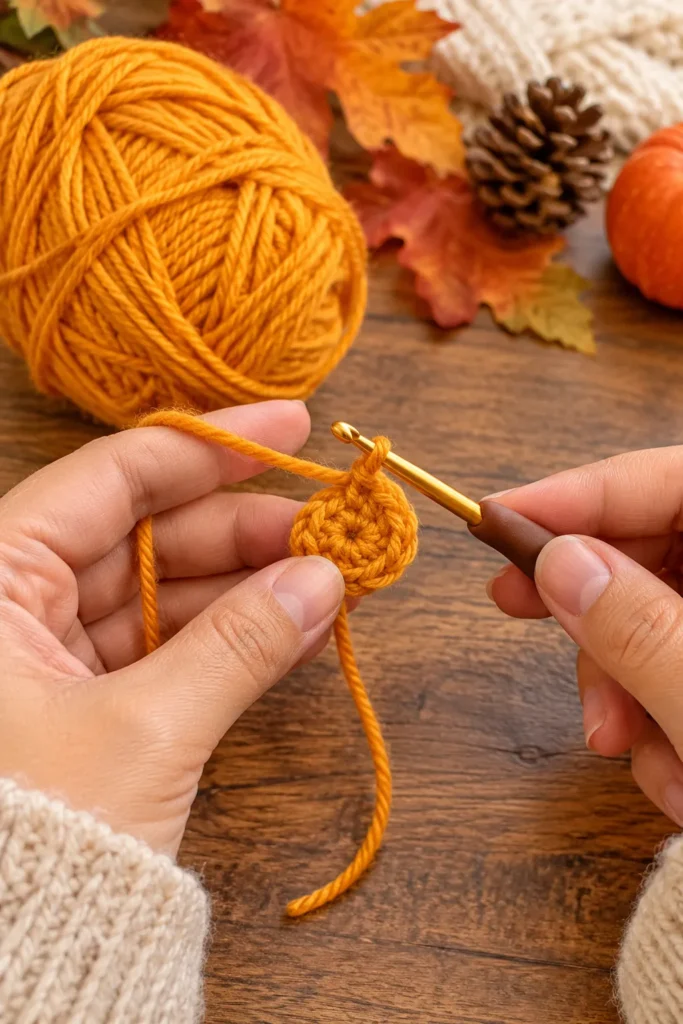
Every cone begins with a tiny circle, and this one is no different. The hat is worked from the tip down, which means you begin at the very top of the point and crochet your way toward the brim. I like this direction because it lets you stuff and shape the tip early, and it means that if you run out of yarn, you will run out at the bottom, where it is easy to blend in a new skein.
Make a magic ring with the marigold yarn. If the magic ring has always felt fiddly to you, take your time, and keep the tail long, at least six inches. Work six single crochet stitches into the ring, then pull the tail tight so the center closes completely. This part matters more than it looks. A loose center leaves a little hole at the very tip of your hat, and you will see it every single time you look at it.
Place a stitch marker in the first stitch of the round and move it up as you go. Because this hat is worked in a continuous spiral, you will not join your rounds or turn your work, and the marker is the only thing that tells you where one round ends and the next begins. I lost my place about three times while making the first version of this hat, and that is how I learned to never skip the marker.
Step Two: Build the Cone
Now the fun starts, because you get to watch a flat little circle slowly turn into a tall pointed hat. The whole trick is how often you add stitches. Add them quickly and the cone becomes short and wide, like a party hat. Add them slowly and it becomes tall and slim, which is exactly the elegant witchy look we want.
For round two, work two single crochet in every stitch around, and you will have twelve stitches. For round three, work one single crochet in the first stitch and two in the next, and repeat that all the way around, which brings you to eighteen stitches. For round four, work two single crochet, then an increase, and repeat around for twenty four stitches. These first four rounds are the only ones that grow quickly, and they set the width of the tip.
From here on, you will work several plain rounds of single crochet between every set of increases. For rounds five through eight, simply work one single crochet in each stitch around, keeping your twenty four stitches. In round nine, work three single crochet, then an increase, and repeat around for thirty stitches. Work four plain rounds. In round fourteen, work four single crochet, then an increase, around for thirty six stitches. Work four plain rounds again.
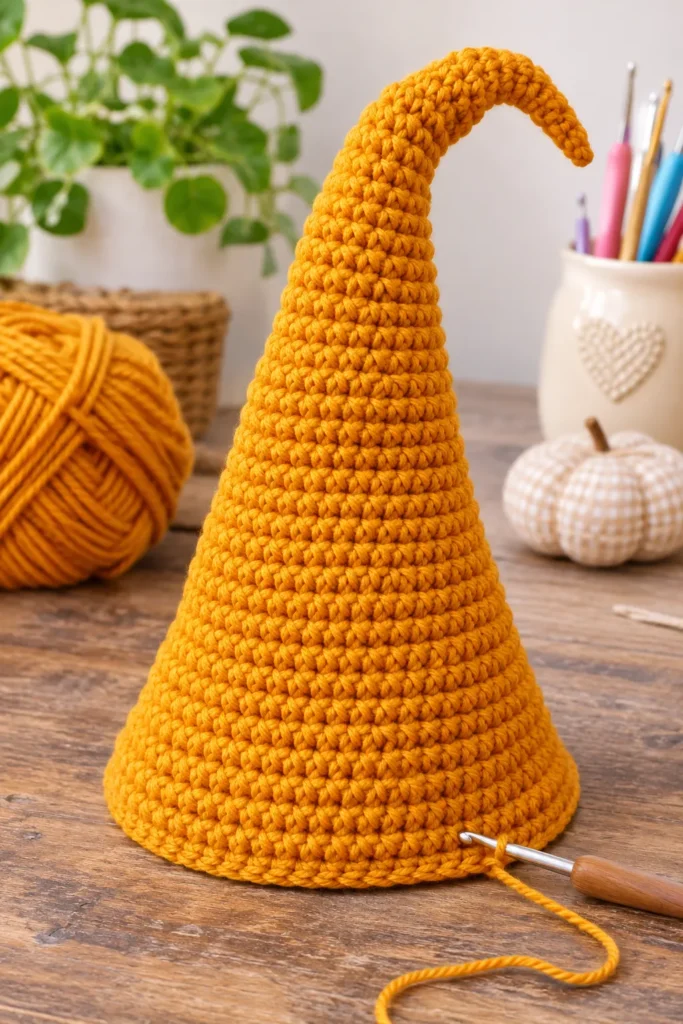
Keep that rhythm going. In round nineteen, work five single crochet and then an increase, for forty two stitches, followed by four plain rounds. In round twenty four, work six single crochet and then an increase, for forty eight stitches, followed by four plain rounds. In round twenty nine, work seven single crochet and an increase, for fifty four stitches. Finish with three plain rounds and then one slip stitch into the next stitch to end. You should now have a long cone with fifty four stitches at its base.
I recommend counting your stitches at the end of every increase round. It takes ten seconds and it saves you from the heartbreak of discovering at round twenty that you are two stitches off. If you do find a mistake, do not panic. A single stitch more or less will not ruin the shape, but a bigger error will make one side of the cone look lopsided, and that is worth fixing.
A tip about stuffing. I like to stuff the tip firmly as soon as the cone is deep enough to hold a little fiberfill, usually around round twelve, and then keep adding small amounts every few rounds. If you wait until the end, the narrow upper part becomes impossible to reach, and you end up with a soft floppy tip and a stuffed bottom. A chopstick or the blunt end of a pencil is wonderful for pushing fiberfill into the narrow part. Do not overstuff, though. You want the cone firm but still smooth, not bumpy.
Another small note. Because the stitches in a cone slant slightly as you work, your single crochet rows will look like gentle spirals instead of perfect horizontal lines. That is completely normal, and honestly it is part of the charm. In the finished hat, those spiral rows catch the light in a really pretty way.
Step Three: Shape the Curl at the Tip
This is the moment that turns a plain cone into a witch hat. That bent, curling tip is what gives the hat its magical, slightly mischievous look, and it is easier to make than you might think.
There are two ways to do it. The first is the wire method. Take a piece of floral wire about eight inches long and fold the last half inch back on itself so there is no sharp end. Push the wire into the stuffed tip of the cone, so it runs about four inches down the inside. Now gently bend the top of the cone into a curve, as if it were a question mark. The wire holds the bend for you, and you can adjust it later if you decide you want the curl tighter or looser.
The second method is the no wire method, which is better if the hat is going to sit in a home with small children or pets. Instead of wire, stuff the upper third of the cone a little more firmly on the inside of the curve and a little less on the outside, then use a few hidden stitches with a yarn needle and a length of marigold yarn to gently pull the tip over. Anchor the stitch inside the cone, bring the needle out near the tip, and tug until the curve sits right. Tie it off inside. It takes a little patience, and your first attempt might look a little crooked, but after a couple of tries you get a feel for it.
I used the wire method in my hat because I wanted a strong, definite curl, and I have been very happy with how it holds up. After a week on my shelf the tip is still curving perfectly. If you make this for a gift, though, I would lean toward the no wire option just to be safe.
Step Four: Make the Brim
A witch hat without a brim is just a funny cone, so now we will add that big flat circle that makes the silhouette so recognizable. We are going to work the brim directly off the base of the cone, which means no sewing and no seams.
Turn the cone upside down so the base faces you. Join the marigold yarn to the front loop of any stitch in the last round of the cone, and work one single crochet in every front loop around, so you have fifty four stitches. Working in the front loop only creates a little ridge at the join, which makes a lovely shelf where the band will sit later. Do not skip this detail, because it is what gives the hat a clean edge between the cone and the brim.
For round two of the brim, work eight single crochet and then an increase, repeat six times, and you will have sixty stitches. For round three, work nine single crochet and then an increase, and you will have sixty six. Keep going like this, adding one more plain stitch between each increase every round, until you reach one hundred two stitches in round eight. That gives you a nice wide brim that lies flat on the table.
If your brim starts to ruffle, you are adding too many stitches, and you should take out a round and reduce the increases slightly. If it starts to cup like a bowl, you are adding too few, and you can add an extra increase or two. This is a very common problem with flat circles, and the fix is always the same. Trust what the fabric is telling you and adjust.
For the last round, work a single crochet in every stitch, and then finish with a round of slip stitches around the edge. This gives the brim a neat, rope like border that makes the whole hat look more finished, and you can see it clearly in the photos. Cut the yarn, weave in the end, and give the whole thing a gentle shake to see how it sits.
Step Five: Crochet the Chocolate Brown Band
The band is the detail that pulls everything together, because it separates the bright marigold from the leaf and acorns and gives the hat a classic witch hat look. I chose a deep chocolate brown for this, but a dark espresso or even a dark plum would also be gorgeous.
With the brown yarn, chain fifty five. Single crochet in the second chain from the hook and in each chain across, which gives you fifty four stitches. Chain one, turn, and work single crochet across for three more rows, so the band has four rows in total. Do not cut the yarn yet.
Wrap the band around the base of the cone, right above the ridge you made earlier, and check that the ends meet without pulling. If it is too tight, add a stitch or two to the starting chain next time. If it is too loose, you can pull the ends together and stitch them closed, then ease the extra fabric into the cone with your needle. Use the yarn needle to sew the short ends together, then stitch the lower edge of the band to the ridge on the hat, and the upper edge to the cone, using small, invisible stitches.
I like to sew the band on rather than crochet it directly because it gives me total control over the placement. You can see in the photos how the band sits snugly against the cone without bunching. If you want a slightly bulky, textured look like mine, work the band in the back loops only for the middle two rows. It adds a ribbed effect that looks lovely against the smooth cone.
Step Six: Make the Maple Leaf
Now for my favorite part, the leaf. I find that a small maple leaf says autumn more clearly than almost anything else, and the rust color pops beautifully against the marigold and brown.
With the rust yarn and your 4.0 hook, chain twelve. Starting in the second chain from the hook, make one slip stitch, one single crochet, one half double crochet, and one double crochet along the chain, which gives you the first point of the leaf, the long one in the middle. Then work two more points on each side in the same way, using shorter chains for the lower points. The easiest way to think about it is that a maple leaf is really five little triangles joined together at a central stem, and each triangle is a mini chain with a slope of stitches on it.
Once you have all five points, work a round of single crochet around the entire outline to give the leaf a clean edge, and finish with a short stem of two or three chains at the base. Weave in your ends. If you want the veins to show, as they do in the photo, take a length of dark brown or deep rust thread and embroider a few straight stitches radiating from the base of the leaf toward each point. It takes five minutes and makes a surprising difference.
If your first leaf looks a little wobbly, do not worry. Leaves in nature are never symmetrical, and a slightly uneven crochet leaf looks more charming than a perfect one. I made three before I got one I loved, and the first two went into the pocket of my cardigan as little good luck charms.
Step Seven: Make Two Tiny Acorns
The acorns are small, but they are what people notice first. They are also where beginners often get nervous, because anything tiny feels harder than something big. Take a deep breath. They are just two small balls and two small caps.
For each nut, use the caramel tan yarn and make a magic ring with six single crochet. In round two, increase in every stitch to get twelve. Work three plain rounds of twelve single crochet. Then decrease around twice, so you go from twelve to six, and stuff the nut firmly with a tiny bit of fiberfill. Close the opening with a yarn needle and hide the tail.
For each cap, use the dark brown yarn and make a magic ring with six single crochet. Increase in every stitch for round two, giving you twelve. In round three, work one single crochet and then an increase around, giving eighteen stitches. Work one plain round, then a round of slip stitches to finish. Place the cap over the nut like a little hat and sew it on with a few stitches around the edge. If you want a little stem, add a tiny chain of two or three stitches at the top of the cap and sew it down.
The acorns look best when they are slightly different sizes, so do not stress about making them identical. I even made one slightly smaller than the other on purpose, and I think it gives the pair a more natural look.
Step Eight: Put Everything Together
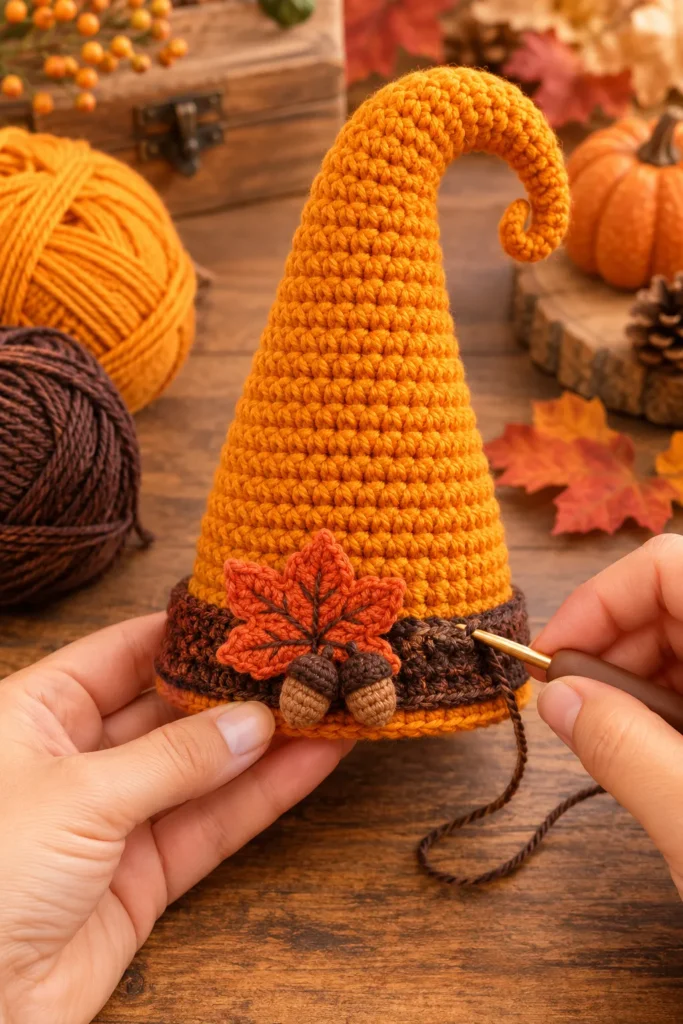
This is the point where all the small pieces turn into one beautiful decoration, and it is genuinely one of the most satisfying parts of the project. Lay the hat on a flat surface and arrange the leaf and acorns on the band before you sew anything. Try a few different positions. I like the leaf slightly off center, tilted a little, with the acorns tucked underneath it so they look like they fell from the same branch.
When you are happy, pin the leaf to the band with a few straight pins. Using the rust yarn and your needle, sew around the edge of the leaf with small stitches, taking care to catch the band but not go all the way through to the inside of the cone. Then place the acorns and stitch each one down with a couple of secure stitches at the cap and one at the bottom of the nut. Check that everything sits snugly and does not wiggle.
I find it helpful to hold the hat in my left hand and sew with my right, just like you can see in the photo. It lets you turn the hat as you work and keeps the band from twisting. Work slowly and gently, because the little acorns will move around if you tug too hard.
Finishing Touches That Make It Look Professional
Weave in every end, and then weave them in a second time. I know that sounds boring, but loose ends are the number one reason handmade decorations start to look messy after a few weeks. Take your time, run the tails through at least two directions, and trim them close to the fabric.
Now give the whole hat a little blocking. Lightly mist the brim with water, lay it flat, and gently press it into a perfect circle. Let it dry completely. If you want a really crisp brim, brush on a very thin layer of fabric stiffener or a one to one mix of white glue and water, then let it dry flat. Do this only on the brim and the cone, and never on the leaf or acorns, because you want those to stay soft and textured.
If your hat leans or wobbles on the shelf, you can add a small weight inside the base. A handful of poly pellets in a tiny fabric bag works well, and it gives the hat a nice stable base. Cover it with a little extra fiberfill so it does not rattle.
Some Common Problems and How to Fix Them
If the cone looks lumpy, it usually means the increases are stacking up in the same place. Try shifting your increases a stitch or two in each round so they spiral instead of forming a line. This is the most common reason cones look like they have corners.
If the tip droops, the fiberfill is probably too loose, or your yarn is too soft. Add a little more stuffing, use the wire method, or add a thin layer of stiffener inside the tip with a small brush. Everyone runs into this at some point, so do not take it personally.
If the brim ripples, you are adding too many stitches, and if it cups upward, you are adding too few. Do not be afraid to rip back a round or two and fix it. A flat brim makes all the difference between a hat that looks professional and one that looks like a pancake.
If the band will not lie flat, check that you worked the correct number of stitches and that you stitched it down evenly. A band that is too tight will pucker, while one that is too loose will bunch. Pin it in several places before you sew to spread the fabric evenly.
Color Ideas and Variations
Marigold is my favorite for this project, but this pattern works beautifully in almost any color. A classic black hat with a deep purple band is perfect for a traditional Halloween look. A soft sage green with a cream band would feel more like a cottagecore garden witch. A burnt orange hat with a dark teal band is rich and moody, and a pale lavender hat with a silver band is a sweet pastel option for spring.
You can also change the embellishments to match the season or your taste. Swap the maple leaf for a small pumpkin, a tiny crescent moon, a little star, or a cluster of berries. Swap the acorns for a pair of mushrooms or a tiny crochet key. If you want to make a set, crochet three hats in different sizes and arrange them in a row, which looks incredibly charming on a mantel.
Ways to Display Your Witch Hat
Once you finish, you will want to show it off, and there are so many fun ways to do it. I placed mine on a rustic wooden table surrounded by small pumpkins, pinecones, and fall leaves, with a string of warm fairy lights nearby. The color of the marigold glows against the dark wood and makes the whole scene feel cozy.
You can also use the hat as a centerpiece for a Halloween dinner, a seasonal display on your front porch, or a shelf accent in your craft room. It makes a lovely gift for fellow crocheters, and I have already started a second one for my sister. If you sell handmade items, a hat like this can be a great seasonal product, especially if you offer it in several colors.
For photos, I recommend natural light from a window, a simple wooden or linen background, and a few props that match your color palette. Shoot from slightly below the hat so you capture the curl of the tip against the background. A tiny bit of warm light in the background makes the stitches glow and gives your photos a magazine quality look.
How to Care for Your Crochet Witch Hat
Because this is a decoration, it does not need much care, but a few simple habits will keep it looking beautiful for years. Dust it gently with a soft brush or a lint roller, and keep it away from direct sunlight, which can fade the yarn over time. If it gets dirty, spot clean it with a damp cloth and a drop of mild soap, and let it air dry completely.
At the end of the season, store it in a breathable cotton bag or a box lined with tissue paper. Avoid plastic bags, which can trap moisture. Place it upright if you can, so the tip does not get crushed, and tuck a little tissue inside the curl to help it hold its shape.
A Few Last Thoughts
I made this witch hat on a quiet evening with nothing planned and a skein of yarn that had been waiting for its moment, and it ended up being one of my favorite projects of the season. There is something deeply satisfying about watching a tiny ring of stitches grow into a full, tall, curling hat, and then dressing it with a leaf and a couple of acorns until it looks like it belongs in a storybook.
If you are new to crocheting in the round, this is a wonderful project to practice on, because every part of it teaches you something useful. You learn how to control your increases, how to stuff a shape evenly, how to build a flat circle, and how to sew pieces together neatly. These are the skills that carry over into amigurumi, hats, bags, and nearly everything else you will ever want to make.
So grab your marigold yarn, put on something cozy, and give it a try. Take your time, enjoy the little rhythm of the stitches, and do not worry about making it perfect. The best handmade decorations are the ones with a bit of personality, and yours will have plenty. I would love to see how yours turns out, so please share a photo or tag us when you finish.
Happy hooking, and have a wonderfully cozy Halloween.